Bid Program Training
- Custom Dashboard Tabs
- Move / Copy Items
- Status Icons
- Database Admin
- Creating / Editing Database Items
- Distressing Option
- Door Option
- Door Profiles - Applied
- Door Profiles - Inside
- Door Profiles - Outside
- Door Profiles - Panel
- Door Styles
- Drawer Box Type
- Drawer Front Styles
- Finish Option
- Material - Exterior
- Material - Interior
- Material Sheet
- Modifications
- Products
- Reveal Option
- Size Restrictions
- Users
- Pricing
- Examples
- GUIDE: New Product with Attributes
Custom Dashboard Tabs
You are able to save filtered bid lists to your dashboard, allowing you to quickly switch between commonly viewed lists. For example, you can create a tab for your Hot Lists, or a tab for orders that have been returned to you. This document will walk you through the process of creating, editing, and deleting your own custom tabs.
Creating a New Tab
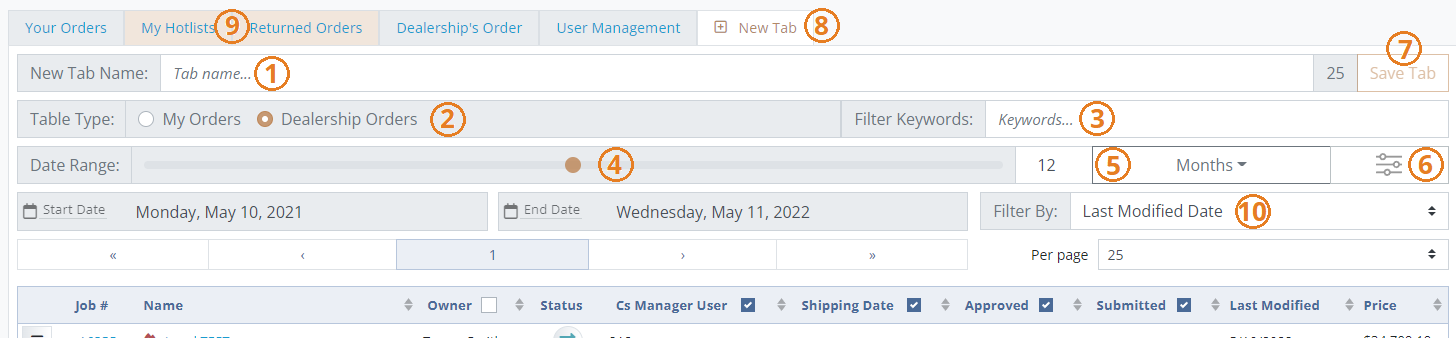
Image 1. View of the New Tab section on the dashboard.
To create a new custom tab, first, click on the tab title "New Tab" on the dashboard page. On this tab, you will set the desired filters, give the tab a name, and save it to your profile. If the provided name matches an existing tab, it will be replaced with the newly created one. The following are explanations for each of the items number in Image 1:
- New Tab Name
- Provide the name of your new tab here. This field is required to save a new tab and has a max length of 25 characters.
- Table Type
- Dealer admins can switch between their own orders or their dealership orders. For normal users, this defaults to show only the user's orders.
- Filter Keywords
- These keywords will filter the list of bids. For example, putting the name of one of your designers / technicians will filter the list to only show their orders.
- Date Range
- Use the date range to set how many days, weeks, or months back from today you want the table to include.
- Date Type Dropdown
- Use this dropdown to change the units of the date range (None, Days, Weeks, or Months). The None option will remove any date range filtering from the table.
- Filters
- Clicking this button with dropdown a list of filters that can be applied to the current table (see Image 2). However this filters are set is what will be saved to your new tab.
- Save Tab
- Once you have provided a name and set the filters to your liking, press this button to add it to your list of tabs. New tabs are placed between the "Your Orders" and "Dealership's Order" tab if you are a dealer admin, or after the "Your Orders" tab for regular users. Custom tabs will show up a different color than the default tabs (see #9 in Image 1).
- New Tab
- Click the New Tab tab to create your own custom tabs.
- Location of Custom Tabs
- Filter By
- Use this to set what property the date range will look at when filtering. Options are: Last Modified Date, Submitted Date, Approved Date, Shipping Date.
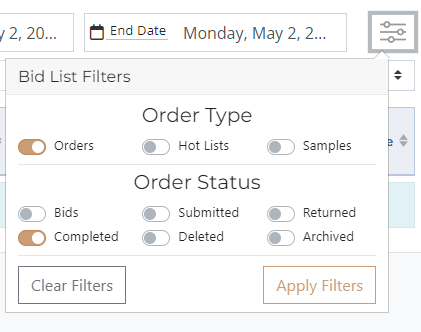
Image 2. Available filters for the current bid list.
The Bid List Filters are split into two categories, Order Type, and Order Status. The following will provide a brief description of what each filter does:
Order Type
- Orders
- Shows any orders with the Order Type set to Normal.
- Hot Lists
- Shows any orders with the Order Type set to Hotlist.
- Samples
- Shows any orders with the Order Type set to Samples.
Order Status
- Bids
- Shows any orders that have not been submitted, returned, completed, deleted, or archived (any active orders).
- Submitted
- Shows any orders that have been submitted, but are not yet completed.
- Returned
- Shows any orders that have been submitted and have been returned to you either with questions, or to be final approved.
- Completed
- Shows any orders that have been final approved.
- Deleted
- Shows any orders that have been deleted, but not permanently deleted.
- Archived
- Shows any orders that have been archived.
The Clear Filters button with turn off any of the currently selected filters. The Apply Filters button will reload the current table with the selected Filters. Filters are stored locally on your computer, so tables should remember the last filters you applied to them.
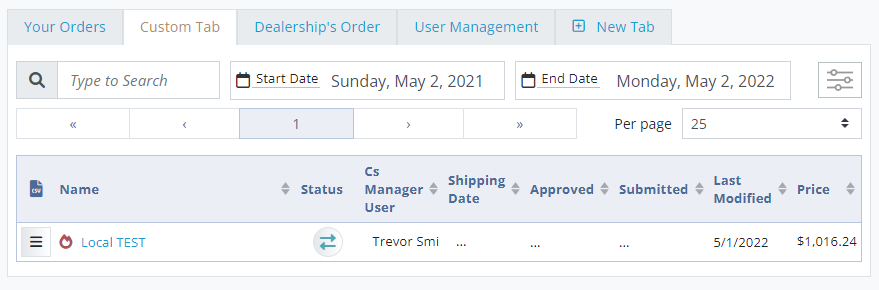
Image 3. Example of a custom tab that shows only Hot Lists that are returned to me.
Editing Custom Tabs
Once a custom tab has been created, it will always default to the filters you set when creating it. To change this, set new filters and using the Filters button and press Apply Filters. That will overwrite the filters saved to this tab. Another way to update tabs is to create a new tab with the same tab name, the new tab will overwrite the original tab with the same name.
Deleting Custom Tabs
To delete a custom tab, press the Delete Tab button that shows up on the Bid List Filters dropdown (see Image 4). This button only shows up on custom tabs, not the preset ones.
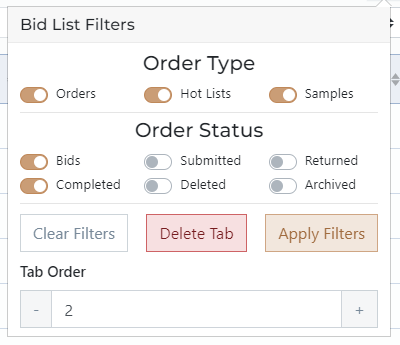
Image 4. Use this Delete Tab button to delete unwanted custom tabs.
Changing Tab Order
Use the Tab Order field on the filters menu (see Image 4) to change where the tab sits amongst all tabs. If there are two tabs with the same Tab Order, they will be sorted alphabetically. Decimal values can be used to fine tune positioning between built-in tabs.
Move / Copy Items
Items can be moved or copied from one bid to another using the "Move / Copy Items" function. The purpose of this article is to explain how to move / copy items, create a new bid from items, or copy a room to an existing bid.
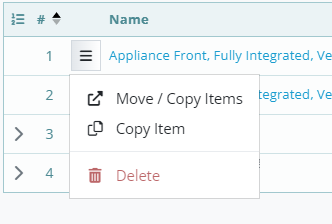
Image 1. Location of Move / Copy Items function in product action menu.
Move / Copy Items to Existing Bid
Select Items
Once Move / Copy Items is clicked in the product action menu, the popup shown below in Image 2 will appear and prompt you to select which items to move / copy, which bid to move / copy them to, and which room inside that bid. Each one of these three actions will take place on the three different tabs labeled: Select Items, Select Bid, and Select Room. On the first tab, you can also toggle where you want to copy the items or move the items by clicking the Copy Items checkbox (it defaults to copy the items). Also on the first tab, you can specify if you would like to create a new bid by clicking the Create New Bid checkbox, this is discussed in another section of this article.
On the Select Items tab, click on each item you would like to move / copy from the list, or use the Select All / Select None buttons. Once you are clear to move on to the second tab, the icon on the Select Items tab will change to a checkmark.
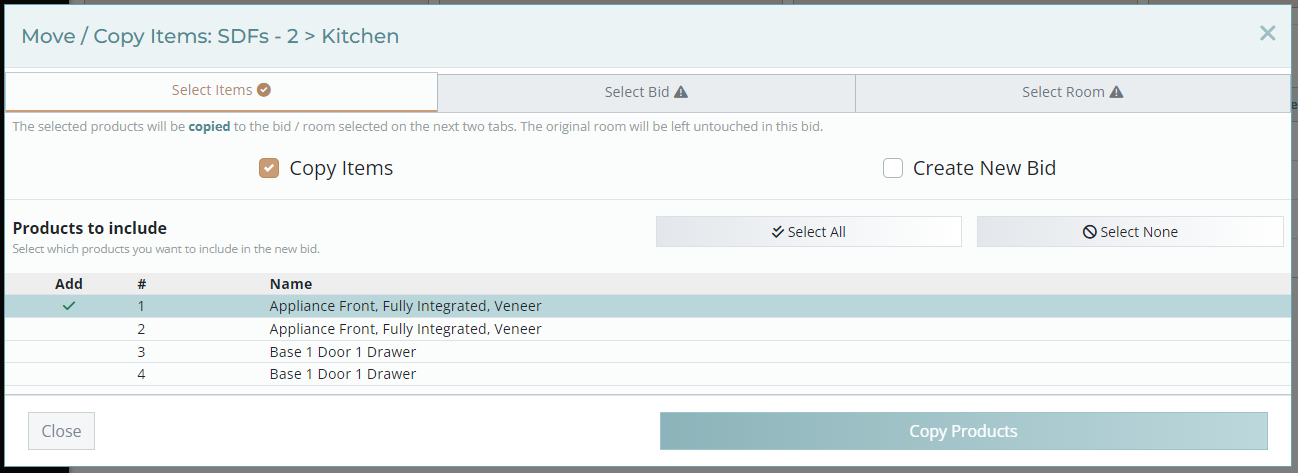
Image 2. Select Items tab to move / copy items.
Select Bid
The second tab is a list of your own bids, this list excludes all fully approved, deleted, and archived bids. If you are a dealership admin, flipping the Dealership Bids switch will show you all bids owned by anyone within your dealership. Once a bid has been selected the tab icon will change to a checkmark and the room will be loaded on the Select Room tab.
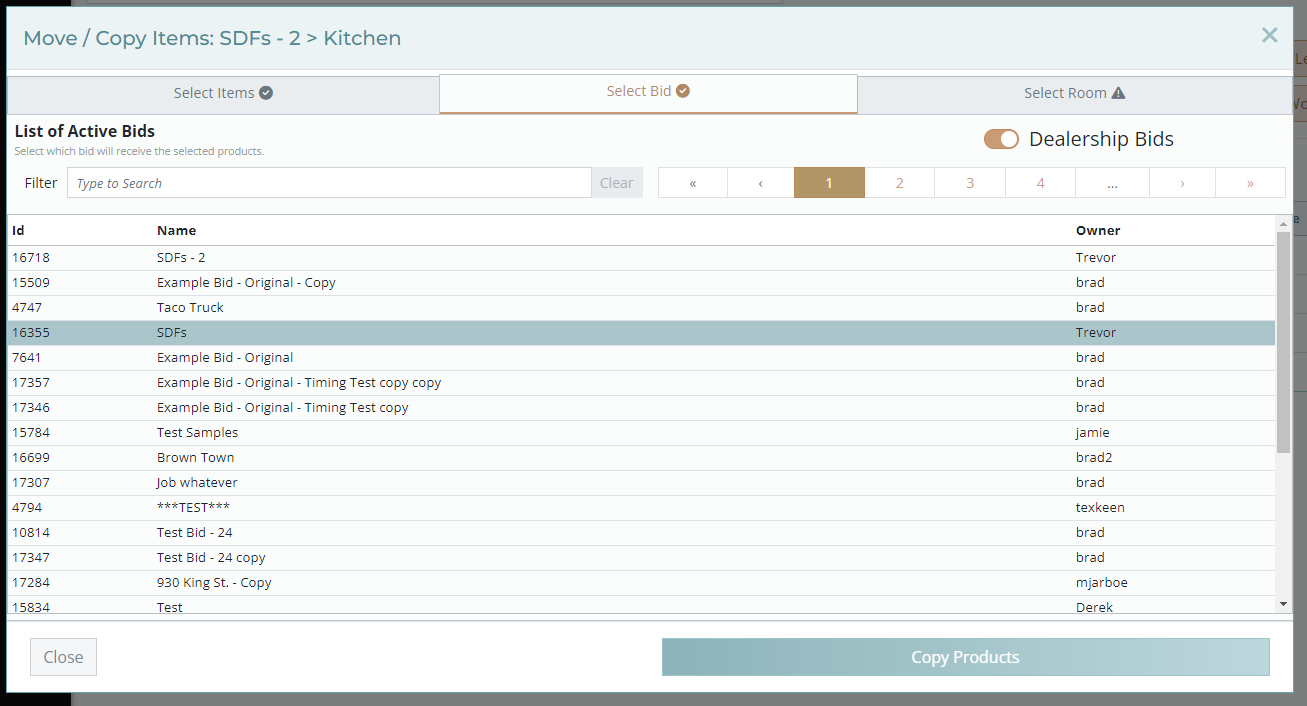
Image 3. Select Bid tab with bid 16355 selected.
Select Room
On this final tab, you will select which room should receive the items chosen on the first tab. If you would like to create a new room with the selected items, click the Create New Room checkbox and provide a name for the new room in the field that appears. If a new room is created, it will have the same Room Specs as the room the selected items are being moved from.
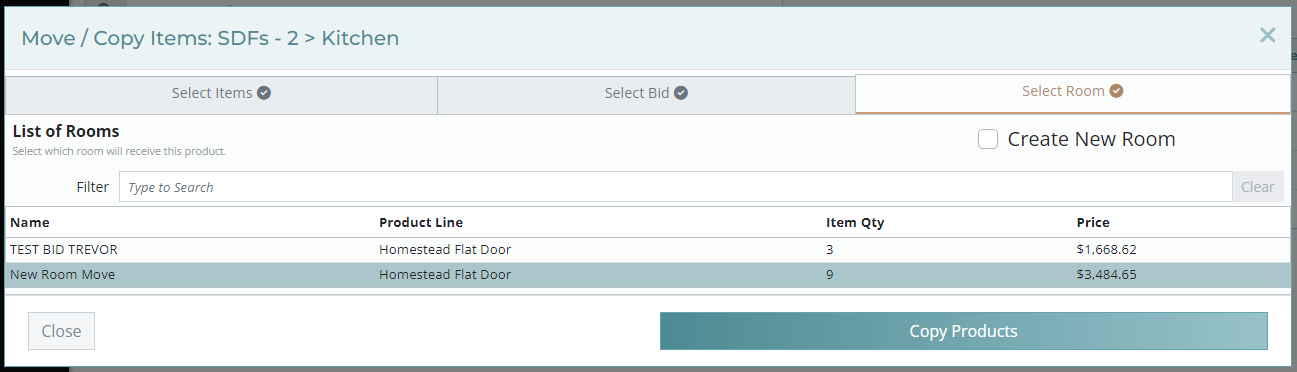
Image 4. Select Room tab with room "New Room Move" selected.
Product Line Issues
If there are any Product Line issues found when moving / copying items, a popup will appear to display which items / modifications aren't allowed in the product line of the selected room. Clicking the button in the bottom right corner will procced with moving / copying any products without issues.
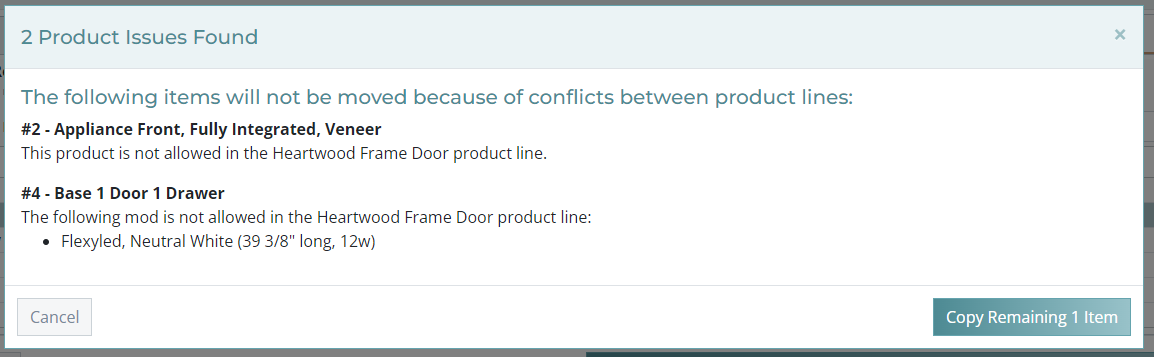
Image 5. List of two Product Line issues found when copying items.
Create New Bid / Hotlist from Items
When the Create New Bid checkbox is clicked, there will be two additional fields that appear, one for the New Bid Name and a checkbox to make the new bid a Hotlist. Once the Create Hotlist or Create Bid button is pressed, a new bid will be created and all the selected items will be copied to a new room inside the new bid. When using this feature, the items will always be copied.
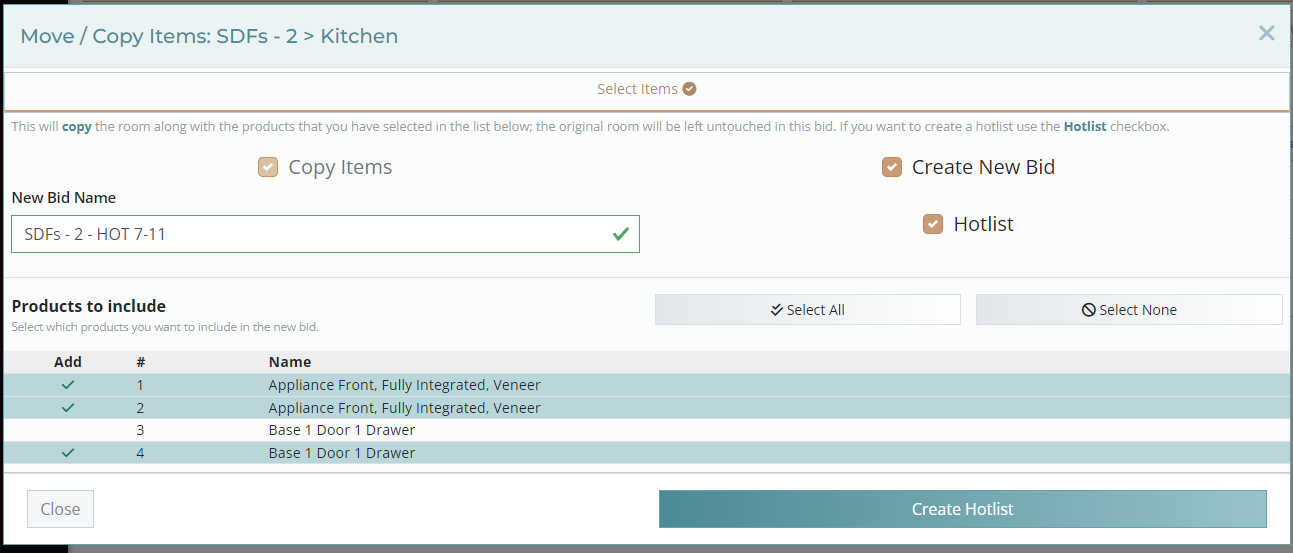
Image 6. Additional info required when creating a new bid.
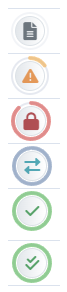
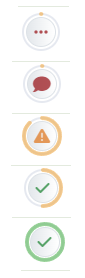
Status Icons
Status Icons are used in the Bid Program to quickly convey the status of a bid, room, or product without the need to open any additional pages. The purpose of this article is to explain the different status icons and their meanings.
Bid |
Room |
Product |
|
|
|
|
| Image 1. Bid, Room, and Product Status Icons. |
||

Bid
The status bar around the bid status icon represents the combined number of approved products and rooms out of the total number of products and rooms.
![]() The bid has not yet been submitted. This same icon is used for unsubmitted rooms and products.
The bid has not yet been submitted. This same icon is used for unsubmitted rooms and products.
![]() The bid has been submitted and there are changes pending approval. or requested.
The bid has been submitted and there are changes pending approval. or requested.
![]() The bid has been submitted and is currently locked and under review by a project manager.
The bid has been submitted and is currently locked and under review by a project manager.
![]() The bid has been returned to you with questions.
The bid has been returned to you with questions.
![]() The bid is ready for your final approval.
The bid is ready for your final approval.
![]() The bid is fully approved and ready for production / produced.
The bid is fully approved and ready for production / produced.
Room
The status bar around the room status icon represents the total number of items approved out of the total number of items in the room.
![]() The room is new and has not been review by a project manager.
The room is new and has not been review by a project manager.
![]() The room has been reviewed but no status has been set by a project manager.
The room has been reviewed but no status has been set by a project manager.
![]() Changes or clarification has been requested, check the room revision notes for details.
Changes or clarification has been requested, check the room revision notes for details.
![]() The room specs are approved, but there are unapproved items in the room.
The room specs are approved, but there are unapproved items in the room.
![]() The room specs and all the items are fully approved.
The room specs and all the items are fully approved.
Product
![]() The product is new and has not been reviewed by a project manager.
The product is new and has not been reviewed by a project manager.
![]() The bid has been reviewed but no status has been set by a project manager.
The bid has been reviewed but no status has been set by a project manager.
![]() There are changes or clarification requested, check the product revision notes for details.
There are changes or clarification requested, check the product revision notes for details.
![]() The product is fully approved.
The product is fully approved.
Status Menus
Clicking on any of the status icons will open a status menu giving you access to the row color, unapproved items, and revision notes. On unsubmitted orders, only the row color will be visible. These menus are to serve as a quick snapshot of what else needs to be approved or answered in the bid, room, or product. Below are snap shots of how each of these menus may look.
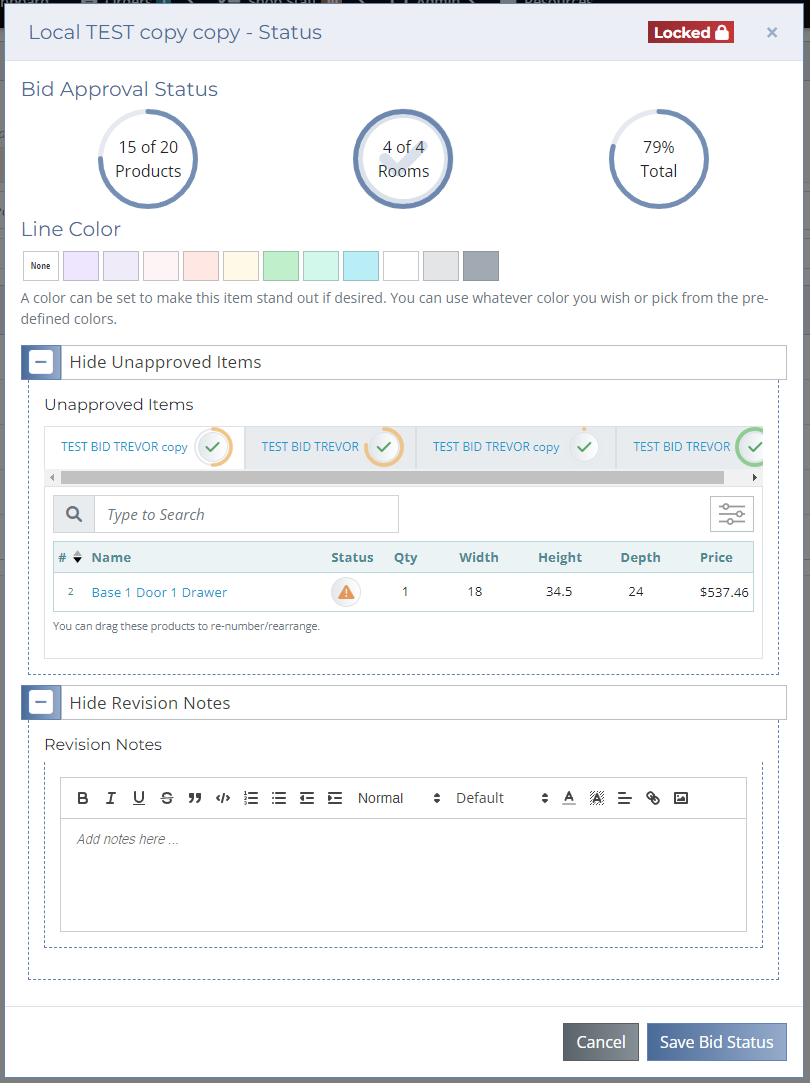
Image 2. Bid status menu.
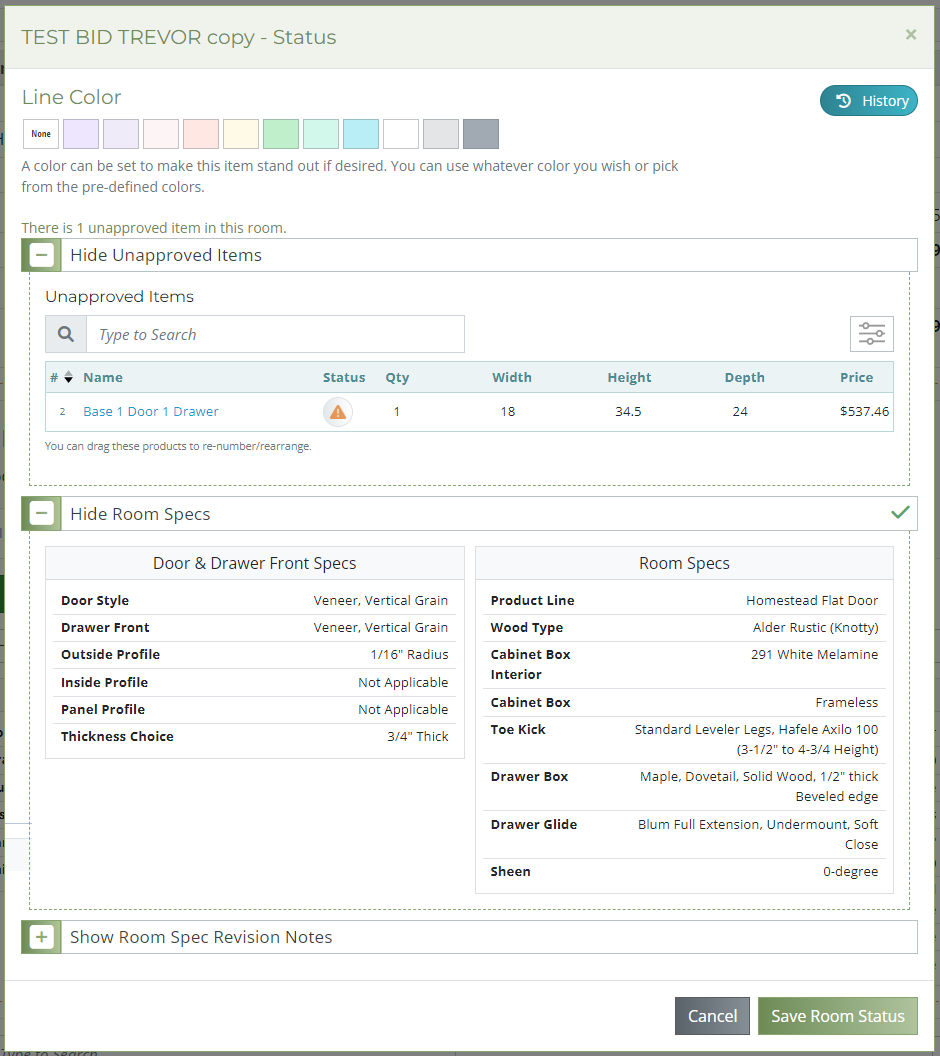
Image 3. Room status menu.
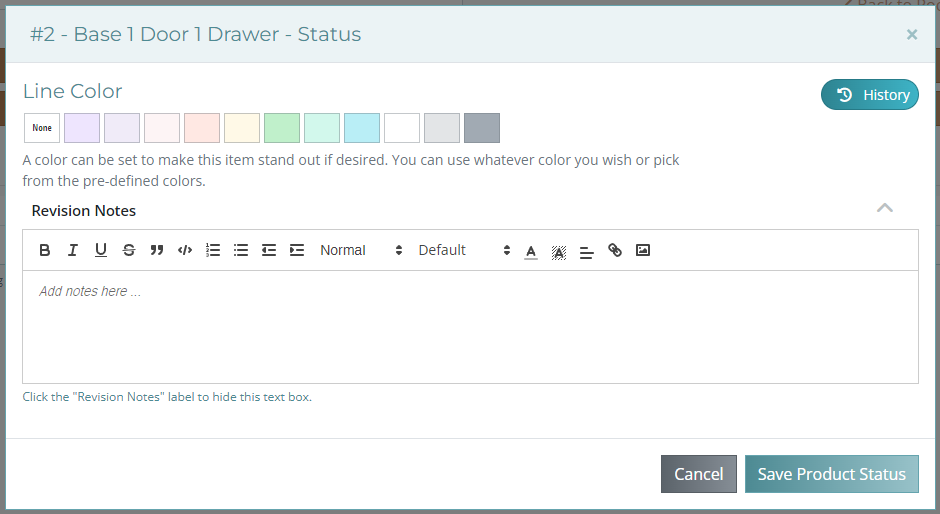
Image 4. Product status menu.
Database Admin
Introduction to the Database Admin
The database admin servers as an interface for select individuals to edit the Bid Program's database. You can use the database admin to easily interface with this database and perform common tasks such as add new products, edit door styles, update material prices, and much more. This training document will cover how to access the database admin and how to navigate it.
Accessing the Database Admin
Users who have been given given the permission of Database Administrator will be able to access the database admin by clicking on Admin > Database Admin in the navigation menu from any page on the site (see Media 1 below). Users without database admin access will not see the admin dropdown in the navigation menu.
Media 1. Accessing the database admin from the navigation menu.
Item List Options

Image 1. Item list action buttons.
Save Options
When editing an item, there are up to 5 save options to choose from, this article will explain in detail what each option does.
Save, create revision
The "Save, create revision" save option will save your current changes to the database and it will also create a cached version of this object for pricing purposes. See the pricing document for additional information. For example, if you want to change a product's base price from $100 to $150 use this button to change the base price for any future bid.
Save, go to next
The "Save, go to next" save option will save your current changes to the database and go to the next item in the list to edit. This is useful if you are manually going through each item and making changes.
Save and continue editing
The "Save and continue editing" save option will save your current changes to the database and reload the item editor for the same item with your saved changes.
Save as new
The "Save as new" save option will NOT save your current changes to the database, it will create a new item based off the current item. If you have unsaved changes when clicking the Save as new option, those unsaved changes will be saved to the new item but not the original item.
Save and add another
The "Save and add another" save option will save your current changes to the database and open a new blank item editor to create another item.
Save
The "Save" save option will save your current changes to the database and returns to the list of items.
Creating a Dealership
Adding a new dealership is done through the "Database Admin" in the Dealer Accounts -> Dealer
Fields
Acronym: A short reference to the dealership that is used in various places. For example Brad's Cabinet Co could have an acronym of BCC.
Markup Percent: An additional amount to adjust this dealership's cost.
Hotlist markup percent: The upcharge you want to charge for hot (expedited) orders.
Now that you have added a new dealership clients should be able to create accounts associated with the new dealership, an administrator will need to approve each account.
Creating / Editing Database Items
Distressing Option
Getting to the Distressing Option List
Distressing Option Editor
This section will explain what each field means.
-
Main
- Name: Required Display name of distressing option.
- Available: When false, will not show up in the list of distressing options on the site.
- Shop Staff Only: When true, only shop staff users can see / add this distressing option.
- Description: Description of the distressing option, shows up on the site.
- Price Per Sq Ft: Price per square foot for this distressing option.
- Image Original: Can upload a single image this distressing option.
-
XML Export
- Export Value: This will overwrite the name of the distressing option that is exported to Microvellum. If blank, the name of the distressing option will be exported.
- MV Prompts: This is a list of properties that will be exported to Microvellum. Can use any of the variables shown on this tab.
-
Availability
- Product Line: This distressing option will be available in all of the selected product lines.
- Material Exterior Categories: This distressing option will be available to any of the exterior materials in the selected categories.
- Material Exterior: Select any specific exterior material that this distressing option should be available on.
Door Option
Getting to the Door Option List
Door Option Editor
This section will explain what each field means.
-
Main
- Name: Required Display name of door option.
- Available: When false, will not show up in the list of door options on the site.
- Shop Staff Only: When true, only shop staff users can see / add this door option.
- Description: Description of the door option, shows up on the site.
- Price Per Door: Price per door for this door option.
- Price Per Door: Price per drawer front for this door option.
- Category: Which category is this door option a part of.
- Image Original: Can upload a single image this door option.
-
XML Export
- Export Value: This will overwrite the name of the door option that is exported to Microvellum. If blank, the name of the door option will be exported.
- MV Prompts: This is a list of properties that will be exported to Microvellum. Can use any of the variables shown on this tab.
-
Availability
- Product Line: This door option will be available in all of the selected product lines.
- Door Styles: This door option will be available to any of the selected door styles.
Door Profiles - Applied
Getting to the Applied Molding List
Applied Molding Editor
This section will explain what each field means.
-
Main
- Name: Required Display name of applied molding.
- Available: When false, will not show up in the list of applied moldings on the site.
- Shop Staff Only: When true, only shop staff users can see / add this applied molding.
- Upcharge Per Door: Price per door for this applied molding.
- Description: Description of the applied molding, shows up on the site.
- Image Original: Can upload a single image this applied molding.
-
XML Export
- Export Value: This will overwrite the name of the applied molding that is exported to Microvellum. If blank, the name of the applied molding will be exported.
- MV Prompts: This is a list of properties that will be exported to Microvellum. Can use any of the variables shown on this tab.
-
Availability
- Product Line: This applied molding will be available in all of the selected product lines.
- Door Styles: This applied molding will be available to any of the selected door styles.
Door Profiles - Inside
Getting to the Inside Profile List
Inside Profile Editor
This section will explain what each field means.
-
Main
- Name: Required Display name of inside profile.
- Available: When false, will not show up in the list of inside profiles on the site.
- Shop Staff Only: When true, only shop staff users can see / add this inside profile.
- Description: Description of the inside profile, shows up on the site.
- Upcharge Per Door: Price per door for this inside profile.
- Image Original: Can upload a single image this inside profile.
-
XML Export
- Export Value: This will overwrite the name of the inside profile that is exported to Microvellum. If blank, the name of the inside profile will be exported.
- MV Prompts: This is a list of properties that will be exported to Microvellum. Can use any of the variables shown on this tab.
-
Availability
- Product Line: This inside profile will be available in all of the selected product lines.
- Door Styles: This inside profile will be available to any of the selected door styles.
Door Profiles - Outside
Getting to the Outside Profile List
Outside Profile Editor
This section will explain what each field means.
-
Main
- Name: Required Display name of outside profile.
- Available: When false, will not show up in the list of outside profiles on the site.
- Shop Staff Only: When true, only shop staff users can see / add this outside profile.
- Description: Description of the outside profile, shows up on the site.
- Upcharge Per Door: Price per door for this outside profile.
- Image Original: Can upload a single image this outside profile.
-
XML Export
- Export Value: This will overwrite the name of the outside profile that is exported to Microvellum. If blank, the name of the outside profile will be exported.
- MV Prompts: This is a list of properties that will be exported to Microvellum. Can use any of the variables shown on this tab.
-
Availability
- Product Line: This outside profile will be available in all of the selected product lines.
- Door Styles: This outside profile will be available to any of the selected door styles.
Door Profiles - Panel
Getting to the Panel Profile List
Panel Profile Editor
This section will explain what each field means.
-
Main
- Name: Required Display name of panel profile.
- Available: When false, will not show up in the list of panel profiles on the site.
- Shop Staff Only: When true, only shop staff users can see / add this panel profile.
- Description: Description of the panel profile, shows up on the site.
- Image Original: Can upload a single image this panel profile.
-
Pricing
- Upcharge Per Door: Price per door for this panel profile.
- Material Type: Which type of material is used (hardwood, veneer, or custom). Determines which material factor should be used.
- Custom Material Factor: Custom material price if Material Type is custom.
-
Availability
- Product Line: This panel profile will be available in all of the selected product lines.
- Door Styles: This panel profile will be available to any of the selected door styles.
-
XML Export
- Export Value: This will overwrite the name of the panel profile that is exported to Microvellum. If blank, the name of the panel profile will be exported.
- MV Prompts: This is a list of properties that will be exported to Microvellum. Can use any of the variables shown on this tab.
Door Styles
Getting to the Door Style List
Door Style Editor
This section will explain what each field means.
-
Main
- Name: Required Display name of door style.
- Available: When false, will not show up in the list of door styles on the site.
- Shop Staff Only: When true, only shop staff users can see / add this door style.
- Buyout: Mark as true if this is a buyout door.
- Description: Description of the door style, shows up on the site.
- Base Price: Base cost per door, not including finishes and other options.
- Wood Type to Use: Required Veneer or Hardware, used to determine if the hardwood factor or the veneer factor should be used.
- Image Original: Can upload a single image for this door style.
-
Options
- Allow Inside Profile: Makes inside profiles available for this door style.
- Allow Outside Profile: Makes outside profiles available for this door style.
- Allow Panel Profile: Makes panel profiles available for this door style.
- Allow Applied Molding: Makes applied moldings available for this door style.
- Allow Stile and Rail: Makes stile and rail widths available for this door style.
- Allow Door Options: Makes door options available for this door style.
- Available Drawer Fronts: List of drawer fronts available for this door style.
- Available Inside Profiles: List of inside profiles available for this door style.
- Available Outside Profiles: List of outside profiles available for this door style.
- Available Panel Profiles: List of panel profiles available for this door style.
- Available Applied Moldings: List of applied moldings available for this door style.
- Available Door Options: List of door options available for this door style.
- Available Stile Widths: List of stile widths available for this door style.
- Available Rail Widths: List of rail widths available for this door style.
- Available Thicknesses: List of door thicknesses available for this door style.
-
Availability
- Product Line: This door style will be available in all of the selected product lines.
- Material Exterior Categories: This door style will be available to any of the materials in the selected exterior material categories.
- Material Exterior: Select any specific exterior materials that this door style should be available on.
-
Defaults
- Default Drawer Front: Default drawer front for this door style.
- Default Rail Width: Default rail width for this door style.
- Default Stile Width: Default stile width for this door style.
- Default Inside Profile: Default inside profile for this door style.
- Default Outside Profile: Default outside profile for this door style.
- Default Panel Profile: Default panel profile for this door style.
- Default Door Options: Default door options for this door style.
- Default Thickness: Default door thickness for this door style.
- Default Applied Molding: Default applied molding for this door style.
-
XML Export
- Export Value: This will overwrite the name of the door style that is exported to Microvellum. If blank, the name of the door style will be exported.
- MV Prompts: This is a list of properties that will be exported to Microvellum. Can use any of the variables shown on this tab.
Drawer Box Type
Getting to the Drawer Box List
Drawer Box Editor
This section will explain what each field means.
-
Main
- Name: Required Display name of drawer box.
- Available: When false, will not show up in the list of drawer boxes on the site.
- Shop Staff Only: When true, only shop staff users can see / add this drawer box.
- Description: Description of the drawer box, shows up on the site.
- Product Line: This drawer box will be available in all of the selected product lines.
- Base Price: Base price for this drawer box.
- Bottom Material Factor: Square footage price for the bottom material of this drawer box.
- Side Material Factor: Square footage price for the side material of this drawer box.
- Drawer Glide Choices: The selected drawer glides will be available for this drawer box.
- Image Original: Can upload a single image this drawer box.
-
XML Export
- Export Value: This will overwrite the name of the drawer box that is exported to Microvellum. If blank, the name of the drawer box will be exported.
- MV Prompts: This is a list of properties that will be exported to Microvellum. Can use any of the variables shown on this tab.
Drawer Front Styles
Getting to the Drawer Front Style List
Drawer Front Style Editor
This section will explain what each field means.
-
Main
- Name: Required Display name of drawer front style.
- Available: When false, will not show up in the list of drawer front styles on the site.
- Shop Staff Only: When true, only shop staff users can see / add this drawer front style.
- Buyout: Mark as true if this is a buyout drawer front.
- Description: Description of the drawer front style, shows up on the site.
- Base Price: Base cost per drawer front, not including finishes and other options.
- Image Original: Can upload a single image for this drawer front style.
-
XML Export
- Export Value: This will overwrite the name of the drawer front style that is exported to Microvellum. If blank, the name of the drawer front style will be exported.
- MV Prompts: This is a list of properties that will be exported to Microvellum. Can use any of the variables shown on this tab.
-
Availability
- Product Line: This drawer front style will be available in all of the selected product lines.
- Door Styles: Select any specific door style that this drawer front style should be available on.
Finish Option
Getting to the Finish Option List
Finish Option Editor
This section will explain what each field means.
-
Main
- Name: Required Display name of finish option.
- Available: When false, will not show up in the list of finish options on the site.
- Shop Staff Only: When true, only shop staff users can see / add this finish option.
- Description: Description of the finish option, shows up on the site.
- Price per Sq Ft: Price per square foot for this finish option.
- Category: Which category is this finish option a part of.
- Image Original: Can upload a single image this finish option.
-
XML Export
- Export Value: This will overwrite the name of the finish option that is exported to Microvellum. If blank, the name of the finish option will be exported.
- MV Prompts: This is a list of properties that will be exported to Microvellum. Can use any of the variables shown on this tab.
-
Availability
- Product Line: This finish option will be available in all of the selected product lines.
- Material Exterior Categories: This finish option will be available to any of the exterior materials in the selected categories.
- Material Exterior: Select any specific exterior material that this finish option should be available on.
Material - Exterior
Getting to the Exterior Material List
Exterior Material Editor
This section will explain what each field means.
-
Main
- Name: Required Display name of exterior material.
- Available: When false, will not show up in the list of exterior materials on the site.
- Shop Staff Only: When true, only shop staff users can see / add this exterior material.
- Description: Description of the exterior material, shows up on the site.
- Shop Notes: Any custom office / shop notes, only visible to shop staff users.
- Product Line: This exterior material will be available in all of the selected product lines.
- Solidwood Factor: Price per square foot for hardwood items.
- Veneer Factor: Price per square foot for veneer items.
- Category: Which category this exterior material belongs to.
- Image Original: Can upload a single image to this exterior material.
- Material Sheet: Can select multiple sheets sizes that this material is available in.
-
Options
- Material Door Styles: These are the door styles that are available to this exterior material.
- Allow Finishes: When checked, this material allows for finish options to be added.
- Material Finishes: These are the finish options that are available to this exterior material.
- Allow Distressing: When checked, this material allows for distressing options to be added.
- Material Distressing: These are the distressing options that are available to this exterior material.
- Allow Sheen: When checked, this material allows for a sheen to be added.
- Material Sheens: These are the sheens that are available to this exterior material.
- Allow Finished Ends: Deprecated When checked, finished ends are allowed for this exterior material.
- Available Interiors with Fin Ends: Deprecated These are the available interior materials for finished ends.
-
XML Export
- Export Value: This will overwrite the name of the exterior material that is exported to Microvellum. If blank, the name of the exterior material will be exported.
- MV Prompts: This is a list of properties that will be exported to Microvellum. Can use any of the variables shown on this tab.
-
Unused...
- Three Quarter Veneer Price Per Sheet: Deprecated Price per sheet.
- Three Quarter Veneer Price Per Sq Ft: Deprecated Price per square foot.
- Solidwood Price Per Bd Ft: Deprecated Price per board foot.
Material - Interior
Getting to the Interior Material List
Interior Material Editor
This section will explain what each field means.
-
Main
- Name: Required Display name of interior material.
- Available: When false, will not show up in the list of interior materials on the site.
- Shop Staff Only: When true, only shop staff users can see / add this interior material.
- Description: Description of the interior material, shows up on the site.
- Shop Notes: Any custom office / shop notes, only visible to shop staff users.
- Product Line: This interior material will be available in all of the selected product lines.
- Adj Factor: Price of material interior, this is calculated based on the sheet cost of the material, marked up by 30%, then divided by the average item base price ($300).
-
adj_factor = ((sheet_price * markup_percent) + sheet_price) / average_base_price
-
- Image Original: Can upload a single image to this interior material.
- Material Sheet: Can select multiple sheets sizes that this material is available in.
-
XML Export
- Export Value: This will overwrite the name of the interior material that is exported to Microvellum. If blank, the name of the interior material will be exported.
- MV Prompts: This is a list of properties that will be exported to Microvellum. Can use any of the variables shown on this tab.
Material Sheet
Getting to the Material Sheet List
Material Sheet Editor
This section will explain what each field means.
-
Main
- Name: Required Display name of material sheet.
- Available: When false, will not show up in the list of material sheets on the site.
- Shop Staff Only: When true, only shop staff users can see / add this material sheet.
- Description: Description of the material sheet, shows up on the site.
- Shop Notes: Any custom office / shop notes, only visible to shop staff users.
- Category: Which category this material sheet belongs to.
- Size Restrictions: Min / Max width, height, thickness of this material sheet.
- Special Order Sheet: Check if this material sheet is special order.
- Override Size Restrictions: When checked, the size restriction for this material overrides the size restrictions of the product.
-
Sheet Info
- Width: Width of sheet.
- Height: Length of sheet.
- Thickness: Thickness of sheet.
- Priority: Priority of sheet between 1 and 10, 1 being high priority 10 being low priority. This is used when determining which sheet size restrictions to check first.
- Stock Quantity: The amount of sheets we have in stock for this material sheet (not currently used).
-
Vendor
- Vendor: Select which vendors we can get this sheet size from (will be removed and moved to the Material Interior / Material Exterior).
- Purchase Price: Price we are purchasing for the sheet (will be removed and moved to the Material Interior / Material Exterior).
- Vendor Lead Time: Lead time for material sheet in days (will be removed and moved to the Material Interior / Material Exterior).
- Vendor Item Number: SKU / Vendor ID of material sheet (will be removed and moved to the Material Interior / Material Exterior).
- Web Link: URL to material sheet (will be removed and moved to the Material Interior / Material Exterior).
-
XML Export
- Export Value: This will overwrite the name of the material sheet that is exported to Microvellum. If blank, the name of the material sheet will be exported.
- MV Prompts: This is a list of properties that will be exported to Microvellum. Can use any of the variables shown on this tab.
-
Availability
- Material Exterior: Selected exterior materials that this material sheet applies to.
- Material Interior: Selected interior materials that this material sheet applies to.
Modifications
Getting to the Modification List
Modification Editor
This section will explain what each field means.
-
Main
- Name: Required Display name of modification.
- Available: When false, will not show up in the list of modifications on the site.
- Shop Staff Only: When true, only shop staff users can see / add this modifications.
- Description: Description of the modification, shows up on the site.
- Category: This is the category of the modification, the modification will show up in this category on the site.
- Size Restrictions: Min / Max width, height, and depth of this modification.
- Display Images: Can upload a single image or multiple images to a modification. Descriptions of images will show up under the image when the image is clicked. The order number of the image is used to determine the order the images are displayed.
-
Pricing
- Total Price: This price is generally used to cover the cost of manufacturing the most basic version of this modification.
- Flat Rate Mod: When checked, no markups will be applied to this modification's price (no dealer markup).
- Price Formulas: Here you can add any existing price formula to this modification. For more information on price formulas, see the pricing articles.
-
Behavior
- On/Off Behavior: JavaScript formula that determines if this modification should be auto added to a product.
- On/Off Qty: JavaScript formula that returns the qty of the mod when it is auto added to a product.
- Behavior Products: Select any product that this mod should be auto added too. The On/Off Behavior still has to evaluate to true for the mod to be auto added to these products.
- Behavior Reason: This should be a short description of why a modification is auto added to a product, it will show up anytime the modification is auto added.
- Allow Custom Quantity: When true, the user can input their own quantity for this modification. If this is false, the modification quantity will be locked.
- Locked Qty Formula: This formula returns the quantity of the modification. If Allow Custom Quantity is true, the user can unlock the quantity and put in their own value.
-
Availability
- Product Line: This modification will be available in all of the selected product lines.
- Product Categories: This modification will be available to any of the products in the selected product categories. This applies down through any of the sub categories, for example, if you select cabinet the modification will be available on any category that starts with cabinet (cabinet -> base, cabinet -> base -> door/open, etc.)
- Products: Select any specific product that this modification should be available on.
-
Attributes
- Attribute Templates: List of attributes on this modification, this should only be used to remove / check which attributes are on a modification, not to add them to the modification.
-
Vendor Info
- Vendor: Dropdown list of which vendor we purchase this modification from.
- Item Number: The vendor item number of this modification.
- Web Link: URL to modification on vendor's site.
- Purchase Price: How much we pay for this modification.
- Vendor: Dropdown list of which vendor we purchase this modification from.
-
Other
- Labor Hours: Number of hours spent in labor for this modification (doesn't currently do anything).
- Labor Rate: Dollars per hour rate of labor for this modification (doesn't currently do anything).
- Labor Cost: Total labor cost for this modification (doesn't currently do anything).
-
XML Export
- Export Value: This will overwrite the name of the modification that is exported to Microvellum. If blank, the name of the modification will be exported.
- MV Prompts: This is a list of properties that will be exported to Microvellum. Can use any of the variables shown on this tab.
Products
Getting to the Product List
Product Editor
This section will explain what each field means.
-
Main
- Name: Required Display name of product.
- Available: When false, will not show up in the list of products on the site.
- Shop Staff Only: When true, only shop staff users can see / add this product.
- Product Line: This product will be available in all of the selected product lines.
- Cabinet Type: This is the category of the product, the product will show up in this category on the site.
- Description: Description of the product, shows up on the site.
- Shop Notes: Any custom office / shop notes, only visible to shop staff users.
- Display Images: Can upload a single image or multiple images to a product. Descriptions of images will show up under the image when the image is clicked. The order number of the image is used to determine the order the images are displayed.
-
Width, Height, Depth
- Default Width (X): Default width of product.
- Default Width (Y): Default height of product.
- Default Width (Z): Default depth of product.
- Allow Zero: When checked, a value of zero will be a valid input for width, height, and depth.
- Lock Width: Doesn't allow user input for width (locked at default value).
- Lock Height: Doesn't allow user input for height (locked at default value).
- Lock Depth: Doesn't allow user input for depth (locked at default value).
-
Pricing
- Base Price: This price is generally used to cover the cost of manufacturing the most basic version of this product.
- Flat Rate: When checked, no markups will be applied to this product's price (no dealer markup).
- Formula Alias: Deprecated This was previously used to map the product to one of the built-in pricing formulas. This has been replaced by the Price Formulas field.
- Num Doors: Number of doors on this product.
- Num Drawers: Number of drawer boxes on this product.
- Num False Drawer Fronts: Number of false fronts on this product (no drawer box attached).
- Num Panels: Number of door panels on this product (wainscot).
- Width (X) Adjustment Factor: For cabinets only. Used to adjust the base price of the cabinet based on the difference between the width of the product being ordered is to the default width. For example, a adjustment factor of 1.2 for a product ordered 2" larger than the default value will add $2.40 to the base price.
- Height (X) Adjustment Factor: For cabinets only. Used to adjust the base price of the cabinet based on the difference between the height of the product being ordered is to the default height. For example, a adjustment factor of 1.2 for a product ordered 2" larger than the default value will add $2.40 to the base price.
- Depth (X) Adjustment Factor: For cabinets only. Used to adjust the base price of the cabinet based on the difference between the depth of the product being ordered is to the default depth. For example, a adjustment factor of 1.2 for a product ordered 2" larger than the default value will add $2.40 to the base price.
- Oversize Width Threshold: Number value, when the product width is larger than this value, the Oversize Width Charge will be added.
- Oversize Height Threshold: Number value, when the product height is larger than this value, the Oversize Height Charge will be added.
- Oversize Depth Threshold: Number value, when the product depth is larger than this value, the Oversize Depth Charge will be added.
- Oversize Width Charge: Dollar value added to product when width exceeds the Oversize Width Threshold.
- Oversize Height Charge: Dollar value added to product when height exceeds the Oversize Height Threshold.
- Oversize Depth Charge: Dollar value added to product when depth exceeds the Oversize Depth Threshold.
- Price Formulas: Here you can add any existing price formula to this product. For more information on price formulas, see the pricing articles.
-
Defaults / Options
- Num Shelves: Default number of shelves on the product. When set to zero, shelves will not be available in this product.
- Use Hinges: When true, hinges will be available on this product.
- Use Toe Kick: Check if the product you are adding has a toe kick.
- Allow Modifications: When true, users will be able to add mods to this product.
- Available Hinging: Any selected value will be an available hinging option for this product.
-
Size Restrictions
- Size Restrictions: Default size restrictions. Min / Max width, height, and depth of this product.
- Use Material Size Restrictions: When checked, the material size restrictions will override the product size restrictions.
- Use Interior Material: Check if this product is made of the cabinet box interior material and should use that material's size restrictions.
- Size Relations: This is a list of any size restrictions that apply to this cabinet. Each size restriction can have a formula that determines when it should be used. If no formulas evaluate to true, the default size restrictions are used.
-
Modifications
- Item Modifications: Can be used to specify which modifications are available to this product.
- Exclude Modifications: Can be used to exclude any modifications that were added to this product from any of it's Cabinet Types.
- Behavior Modifications: These are modifications that will be added automatically to this product if their behavior formula evaluates to true. An example of this is the Lateral Stabilizer mod for cabinets with drawer boxes that exceed 36" wide.
-
Attributes
- Attribute Templates: List of attributes on this product, this should only be used to remove / check which attributes are on a product, not to add them to the product.
-
Labels
- Required These are all self-explanatory, you can use them to override the default label for any built-in product fields.
-
Misc
- Default Finished Interior: When checked, the product will always start with a finished interior.
- Need Width for Blind: Check if this is a blind cabinet that should ask for the door width.
- Need RPE Info: Check if this product needs stile / rail information.
- Equivalent Units: Needed for the "Equivalent Units" shipping formula. Not needed if you're not using that shipping formula.
- Lock Quantity at 1: When true, the product will remain locked at a quantity of 1.
- Reveal Type: Base, Wall, Tall, or None. Will determine which room level default reveals will be used for this product. If None, the reveals fields will not show on the product.
- 3D Model: 3D Model file (.GLTF) that will display in the 3D cabinet viewer (.GLTF and .BIN are required).
- 3D Model Bin File: 3D Model file (.BIN) that will display in the 3D cabinet viewer (.GLTF and .BIN are required).
-
XML Export
- Export Value: This will overwrite the name of the product that is exported to Microvellum. If blank, the name of the product will be exported.
- MV Prompts: This is a list of properties that will be exported to Microvellum. Can use any of the variables shown on this tab.
Reveal Option
Getting to the Reveal Option List
Reveal Option Editor
This section will explain what each field means.
-
Main
- Available: When false, will not show up in the list of reveal options on the site.
- Name: Required Display name of reveal option.
- Decimal Value: Value of reveal as a decimal.
- Description: Description of the reveal option, shows up on the site.
- Shop Notes: Description of the reveal option, only shows up on the site to shop staff users.
- MV Prompts: This is a list of properties that will be exported to Microvellum. Can use any of the variables shown on this tab.
- Product Line: This reveal option will be available in all of the selected product lines.
Size Restrictions
Getting to the Size Restriction List
Size Restriction Editor
This section will explain what each field means.
-
Main
- Name: Required Display name of size restriction.
- Minimum Width (X): The minimum width that an item can be.
- Minimum Height (Y): The minimum height that an item can be.
- Minimum Depth (Z): The minimum depth that an item can be.
- Maximum Width (X): The maximum width that an item can be.
- Maximum Height (Y): The maximum height that an item can be.
- Maximum Depth (Z): The maximum depth that an item can be.
- Priority: This is the level of priority assigned to this size restriction (1 being highest priority and 10 being lowest priority).
- On/Off Behavior: This JS code is used to determine if the size restriction should be used. This needs to return either null, true or false. If true then the size restriction will be used, if false, the other size restrictions will be evaluated until a true value is returned. This is only used for products that have more than one size restriction linked to it.
Users
Getting to the User List
User Editor
This section will explain what each field means.
-
Main
- Username: Required Display name / login of user.
- Password: Required Secure hashed password, raw passwords are not stored.
-
Personal Info
- First Name: User first name.
- Last Name: User last name.
- Email Address: User email address.
-
Permissions
- Active: When true, the user will be able to login.
- Staff Status: When true, the user is a shop staff member and will have full access to all dealership orders.
- Superuser Status: Designates that this user has all permissions without explicitly assigning them.
- Groups: Used to group users into specific groups. As of right now, there is only a project managers group.
- User Permissions: This can be used to set database admin permissions that can limit how much a shop staff user can do / see in the database admin.
-
Important Dates
- Last Login: Date and time of the last time the user logged in. This get set every time the user logs in with their username / password.
- Date Joined: Date and time that the user first logged in / created their account.
-
More Info
- Phone Number: User's phone number.
- Avatar: User's profile image, can be set by the user on the site.
-
Admin Settings
- Shop Staff: When true, the user is a shop staff member and will have full access to all dealership orders.\
- Is Developer: When true, the user has additional access to developer only tools on the site.
- Database Administrator: When true, the user has access to the database admin site.
-
Dealership
- Dealership: Select which dealership this user belongs to.
- Dealer Membership Approved: This gets set to true once a user's request to join a dealership has been approved.
- Dealer Admin: When true, this user can see / edit all the orders at their specific dealership. They also have the ability to deactivate and add new user's to their dealership.
-
Notifications
- CC Emails: List of carbon copy emails that will be included with any email that is sent to the main email address.
- Dealer Submitted: Send an email when an order is submitted.
- Shop Approved: Send an email when an order is shop approved.
- Dealer Approved: Send an email when an order is dealer approved.
- Resources: Send an email when a document is added to the resources page.
Pricing
How Does Pricing Work?
Pricing is a tiered system:
- Bid price is a sum of all the room prices plus the shipping price and hotlist fee.
- Room prices are a sum of all the product prices.
- Product prices are a sum of all the product pricing formulas, attribute prices, and modification prices.
- Modification prices are a sum of any modification pricing formulas and attribute prices.
Pricing Breakdown
A product's pricing breakdown (see Image 1) can be viewed by clicking on the product price wherever it is visible (on product lists or the product editor). The pricing breakdown shows a breakdown of all the pricing that goes into the final price of the product, any green line items can be clicked to see a popup of the pricing formula and it's variables (see Image 2). If there are any errors in the pricing formula or any of it's variables, it will be outlined in red and will tell you the error in the formula breakdown.
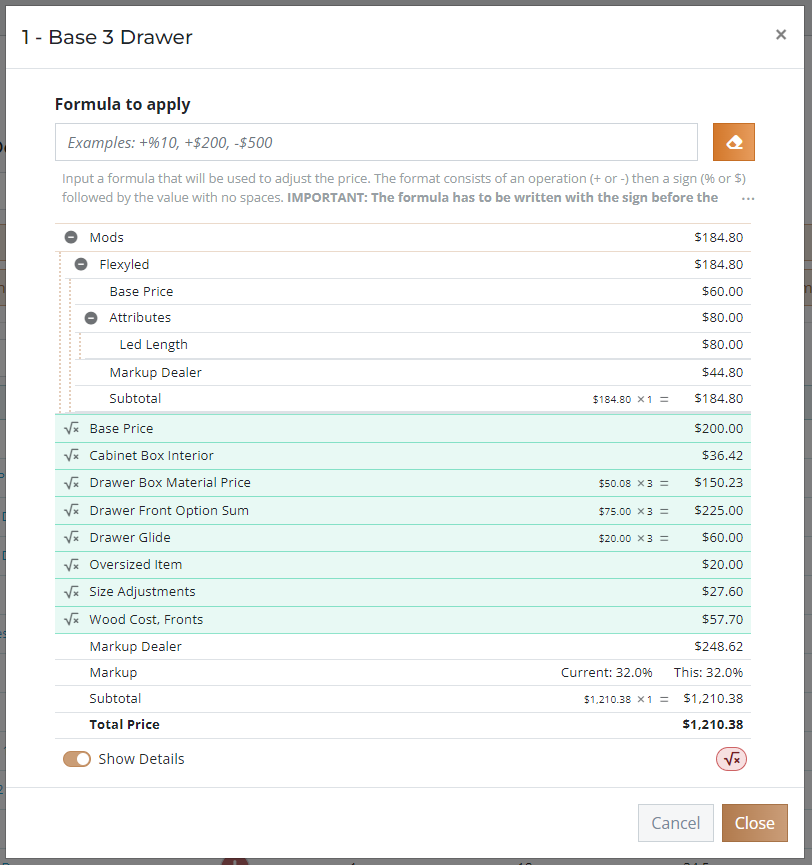
Image 1. Pricing breakdown of Base 3 Drawer product.
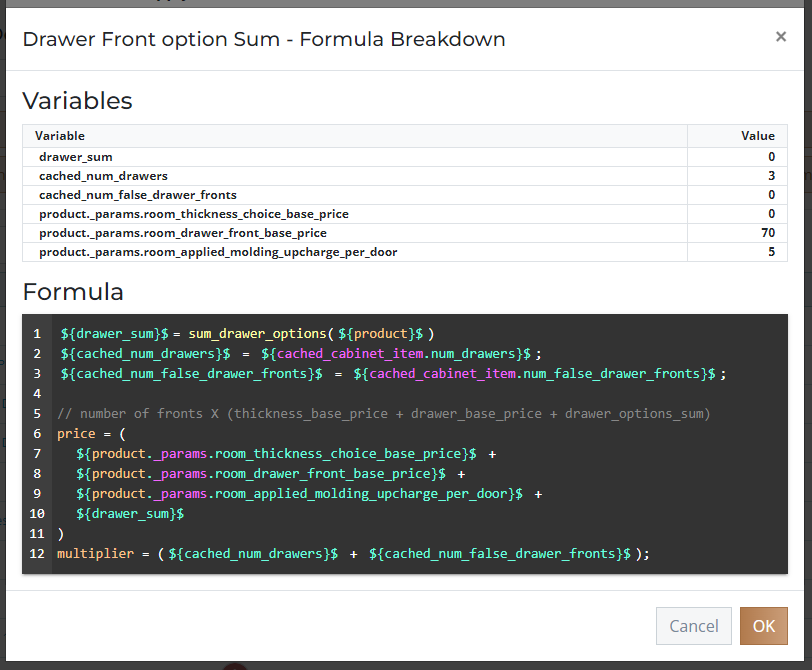
Image 2. Formula Breakdown of Drawer Front Option Sum formula.
While in edit mode, all pricing formulas will be shown, even those that are $0.00. By clicking the edit icon on the right end of the line item, the pricing formula editor will open for this pricing formula in a new tab (see Image 3).
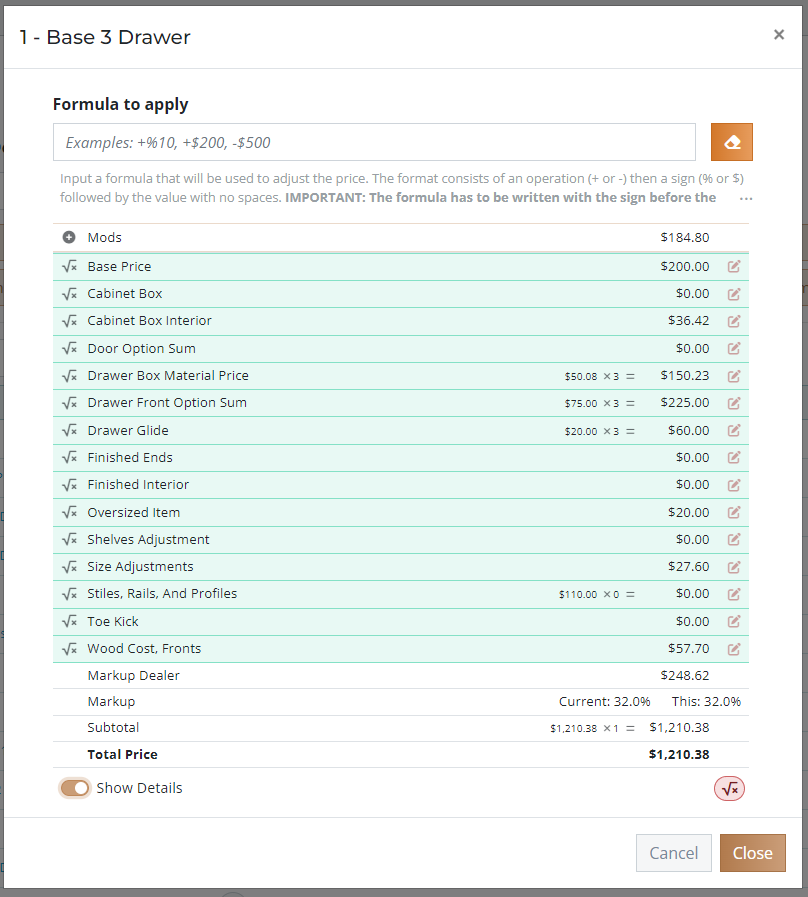
Image 3. Pricing breakdown in edit mode.
Pricing Formulas
Pricing formulas are written in JavaScript in the pricing formula editor. A single formula can be shared by any number of products / modifications, for example, the Base Price formula is shared by basically every product on the site. A single product / modification can have any number of formulas linked to it.
Each formula has a Start Date and Expiration Date which are used to determine if this formula should be used when calculating a product price. For example, the Door Option Sum formula has a start date of 11/9/2022 and no expiration date, this means that a bid with a pricing date after 11/9/2022 will use this formula (see Image 4).
If no start date is set on a formula, all bids, regardless of the pricing date, will use the formula. If a bid's pricing date is old enough that no formulas apply, the built-in formulas will be used as a fallback.
Expiring a Price Formula
The expiration date is used to disable a pricing formula after a certain pricing date. As an example, the Door Panels V2 formula has a start date of 11/9/2022 and an expiration date of 12/6/2022, this means that this formula is only used by bids with a pricing date between those two dates. Any bids with a pricing date after 12/6/2022 will not use this formula. This feature is used to expire old pricing formulas and introduce new formulas.
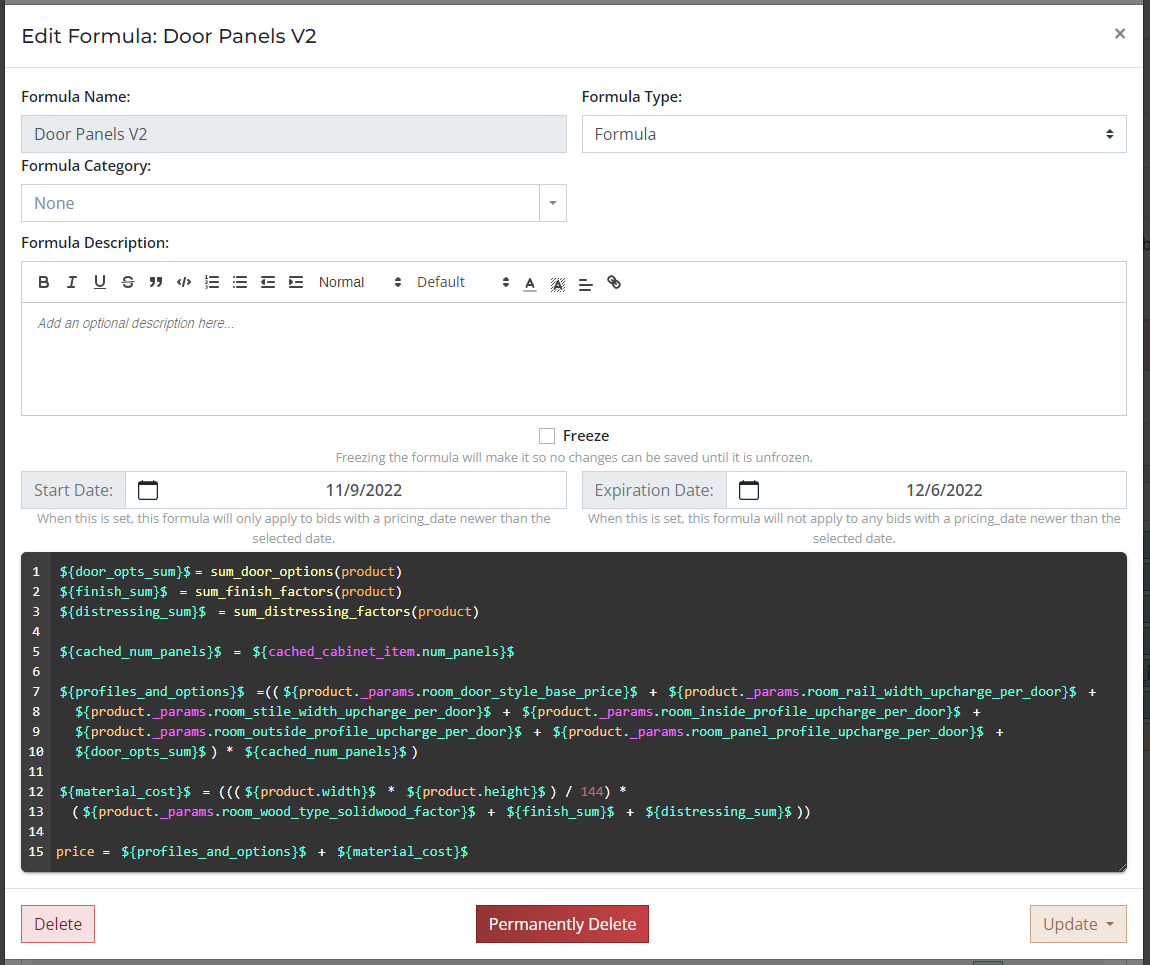
Image 4. Door Panels V2, expired formula example.
Link Formulas to Products / Modifications
There are three ways to link price formulas to a product / modification:
- Global Formula Actions
- In the pricing formula editor, you can use the actions column in the global formulas to add / remove modifications from the currently selected product / modification. This is useful when working on a single product.
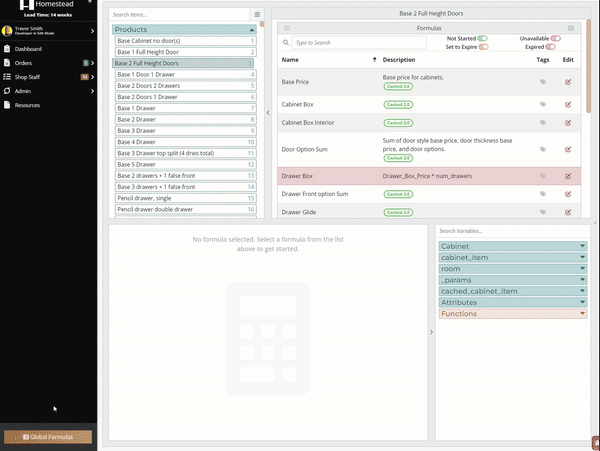
Image 5. Add / remove formulas via global formula actions.
- Global Formula Multi-Select
- In the pricing formula editor, you can select a single pricing formula to save to multiple products / modifications at once. Click on the formula in the global formulas, then switch to the second tab to use the Multi-Select feature.
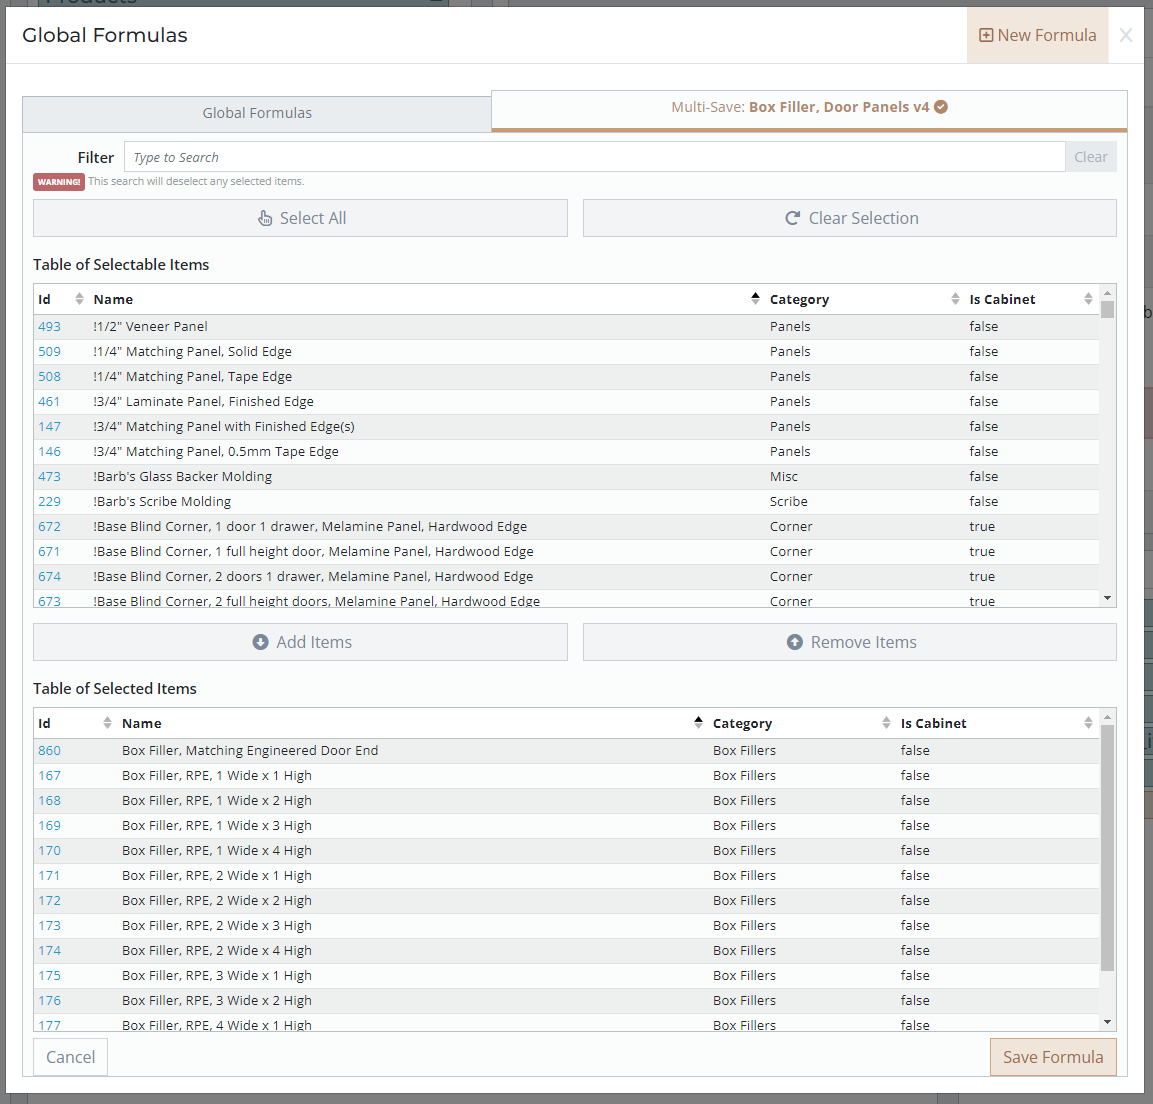
Image 6. Add / remove formulas via global formula multi-select.
- Database Admin
- From the database admin on the product / modification editor page, you can use the Price Formulas to link to any existing pricing formula.
Pricing Versions
In order to ensure accurate pricing on orders as pricing factors change, we keep a record of all pricing factors (materials, door styles, product base prices, etc.) when they are changed. These records are called Versions and can be viewed in the database admin by clicking on the History button from within the item editor (see Image 7). A Version is basically a snapshot of the database entry when it is saved so we can keep track of what changes and when.
All bids are assigned a Pricing Date when they are created which determines which Version should be used. For example, a bid with a pricing date of August 22th, 2023 would use the Version from Nov. 10, 2022, 12:01 a.m. in the image below because it is the first Version before the pricing date. If a bid were created today, it would use the Version from Aug. 25, 2023, 12:02 p.m. because it is the most recent Version before the pricing date. This essentially allows us to lock in pricing for dealers on bids even though prices change quite frequently.
By clicking on the Date/Time of a Version you can edit any of the cached values of that Version or you can revert the current database entry to the cached Version.
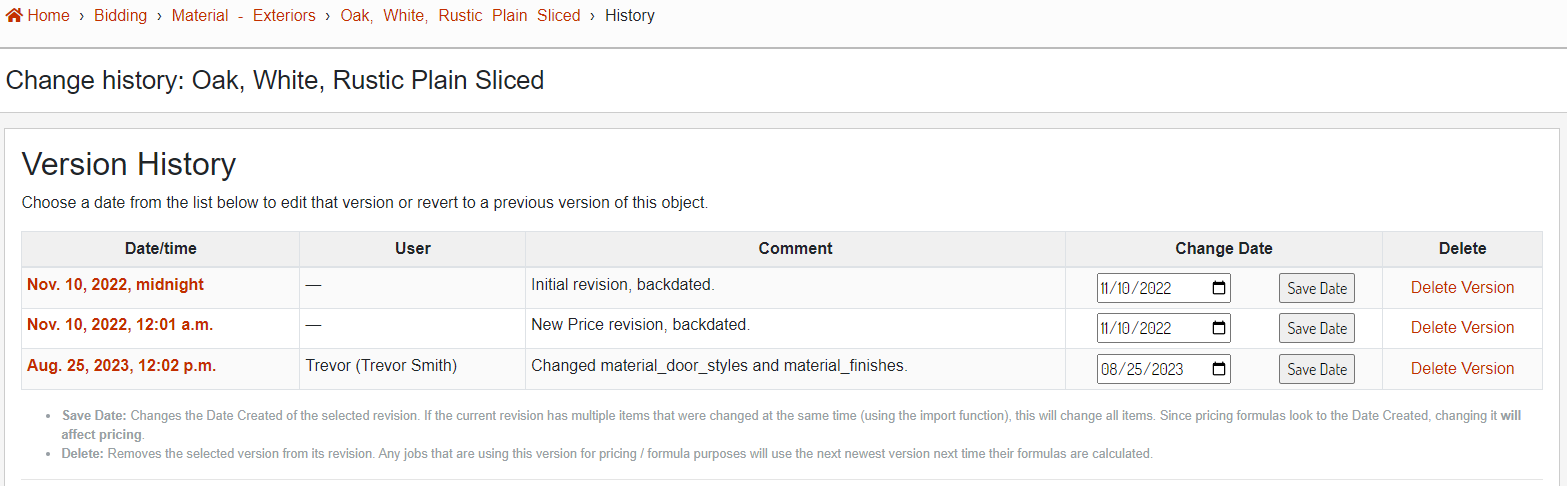
Image 7. Version history for Oak, White, Rustic Plain Sliced.
Pricing Date
A bid's pricing date can be checked or changed by clicking on the bid price from any page. You can select a new date for the pricing date, this will update all pricing for the bid (see Image 8).
Image 8. Accessing the bid pricing date.
Examples
Add Modification
In this article, we will go through how to add a modification and make sure it is available where you want it.
Adding the Modification
From the modification list in the database admin, click the "Add Modification" button. Fill out all the needed information on each tab in the modification editor.
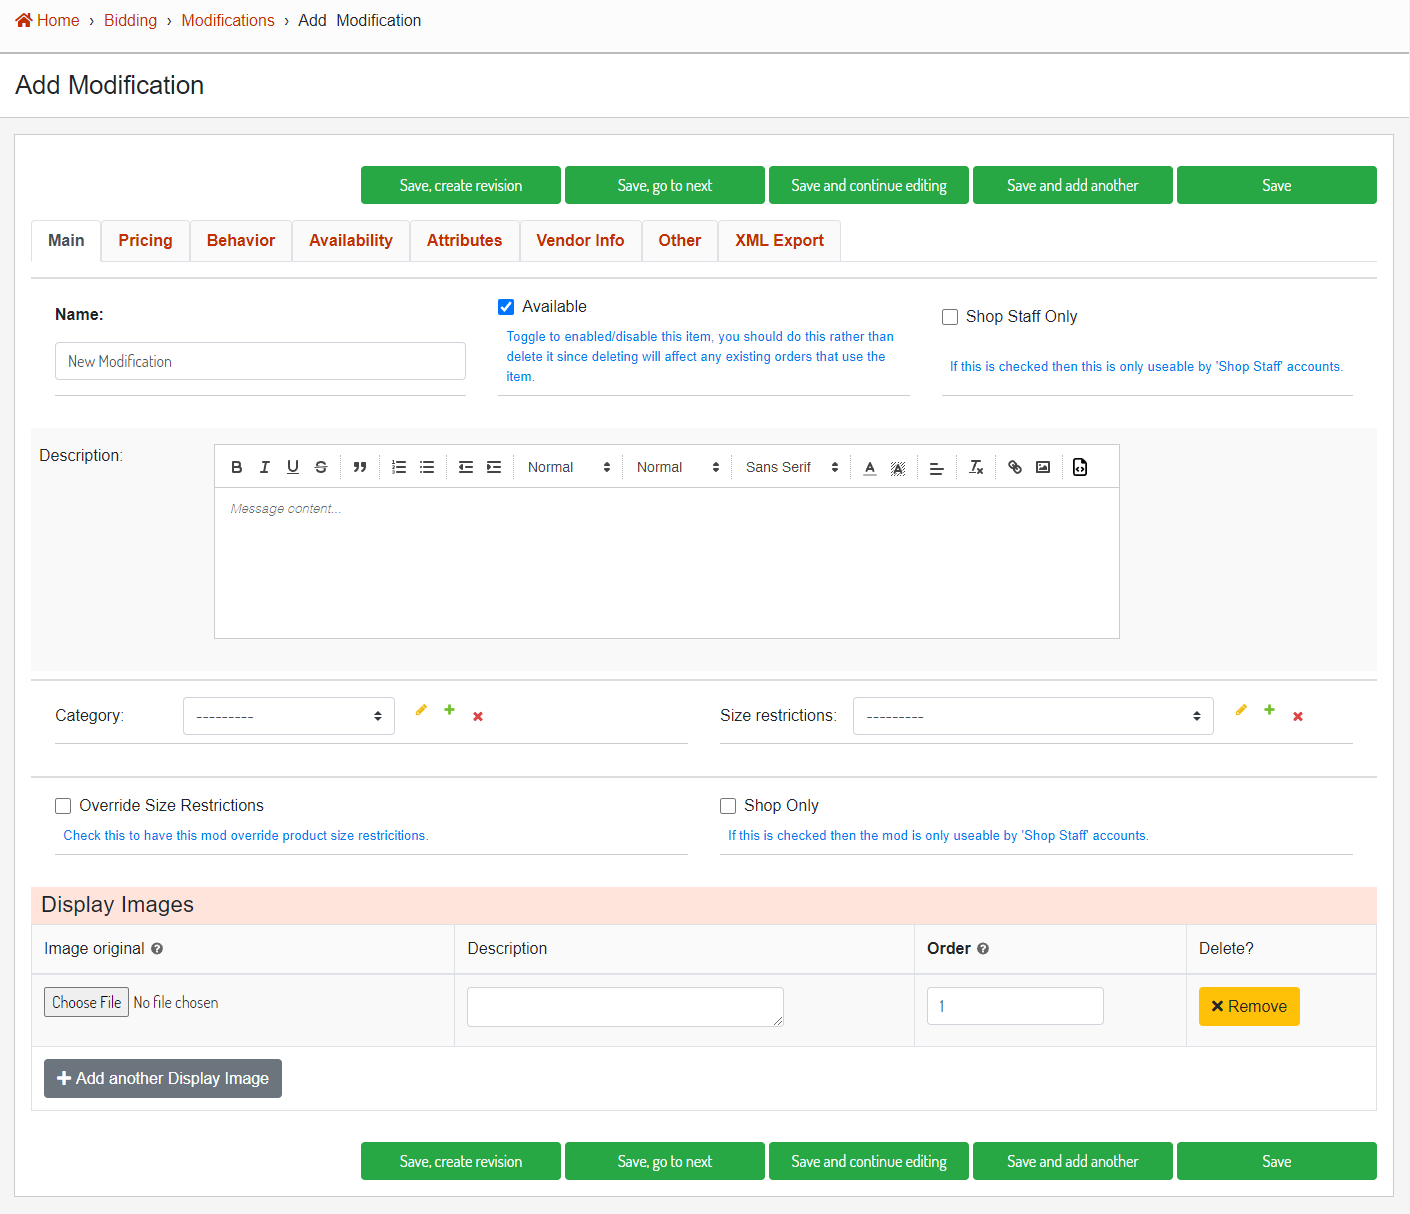
Image 1. The modification editor for a new modification.
Assigning Availability
Product Line
Assign which product line(s) this modification is available in.
Product Categories
Assign which product categories this modification should be available in. This modification's availability will be passed down through the categories down to the products. For example, if you choose the Cabinet category, it will apply to all of the sub categories (cabinet -> base, cabinet -> base -> door/open, cabinet -> wall -> corner, etc.)
Products
If you need to assign the modification directly to a product and not all the other products in the category, you can choose the products from this list.
Change Price
When changing an item's price you will want to use the "Save, create revision" button to set a date for the price change and create a version.
Product Price Change with Version
After changing the price, click the "Save, create revision" button. This will save the new price to the database item and will also create a version with the current date and time. This will make it so any bid created after the current time would use the new pricing and anything older than that would use the previous pricing version.
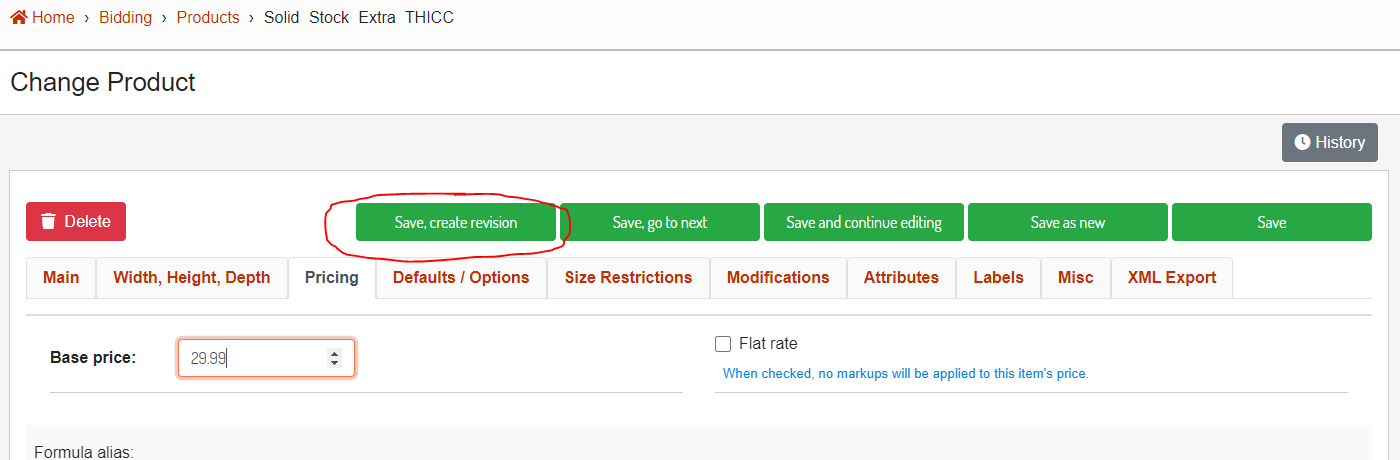
Image 1. Location of "Save, create revision" button.
Pricing Version
This article will go over a all of the functions that you can perform to a item version.
Getting to the Pricing Versions
Click the History button from any of the item editor pages in the database admin that supports versions.
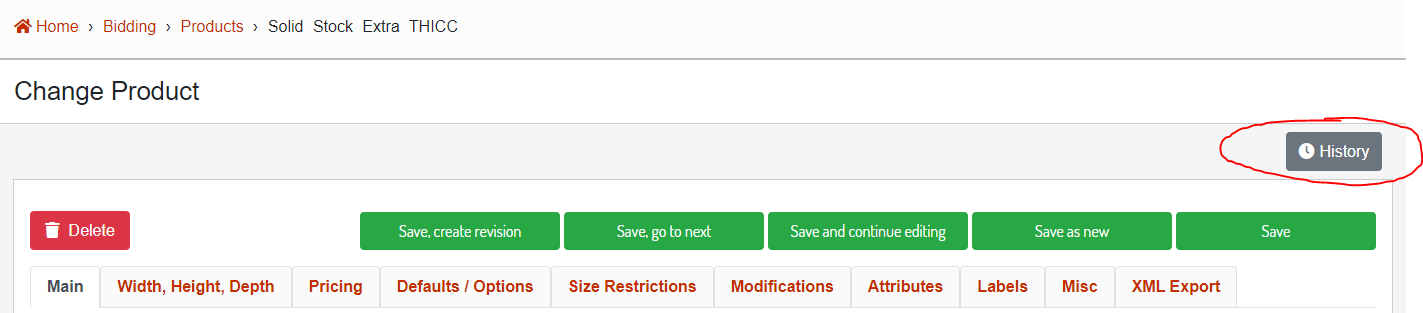
Image 1. Location of the item history button.
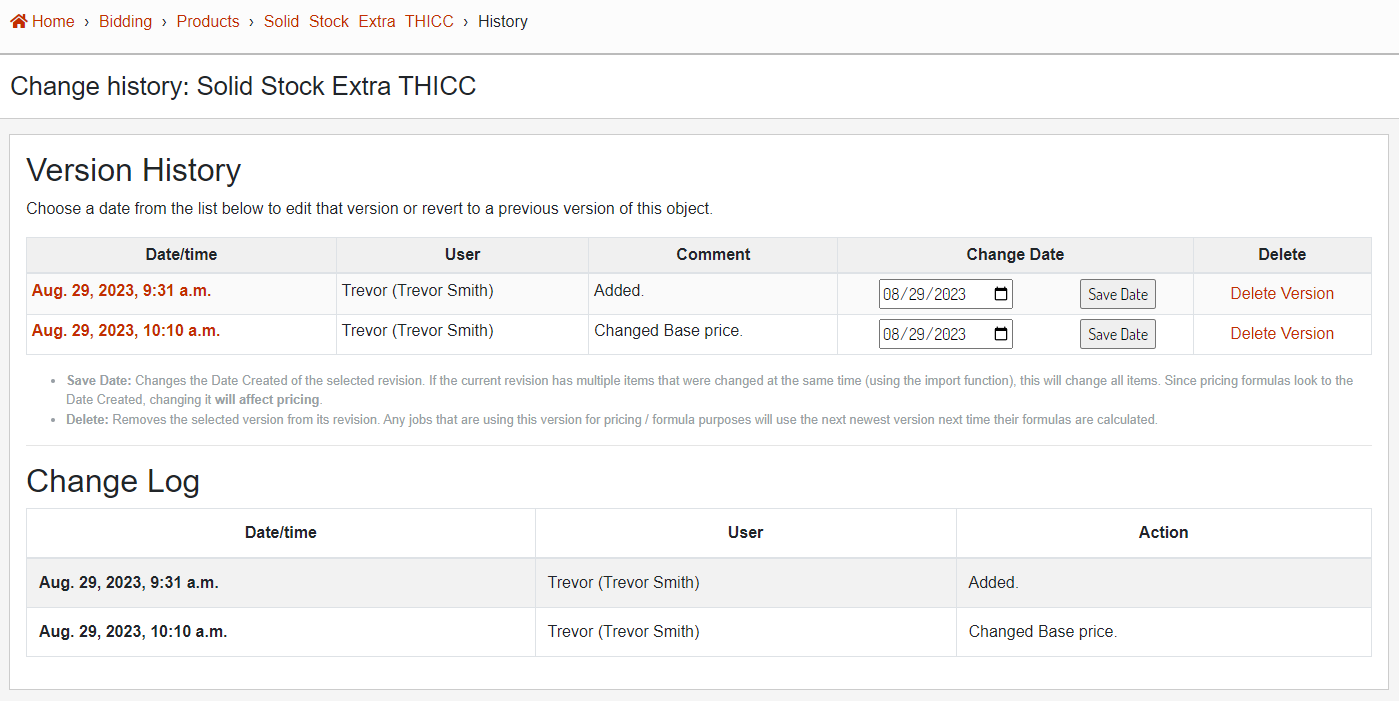
Image 2. Version history and change log.
Edit Version
To edit an existing version, clicking on the Date / Time of the version will open the version editor.
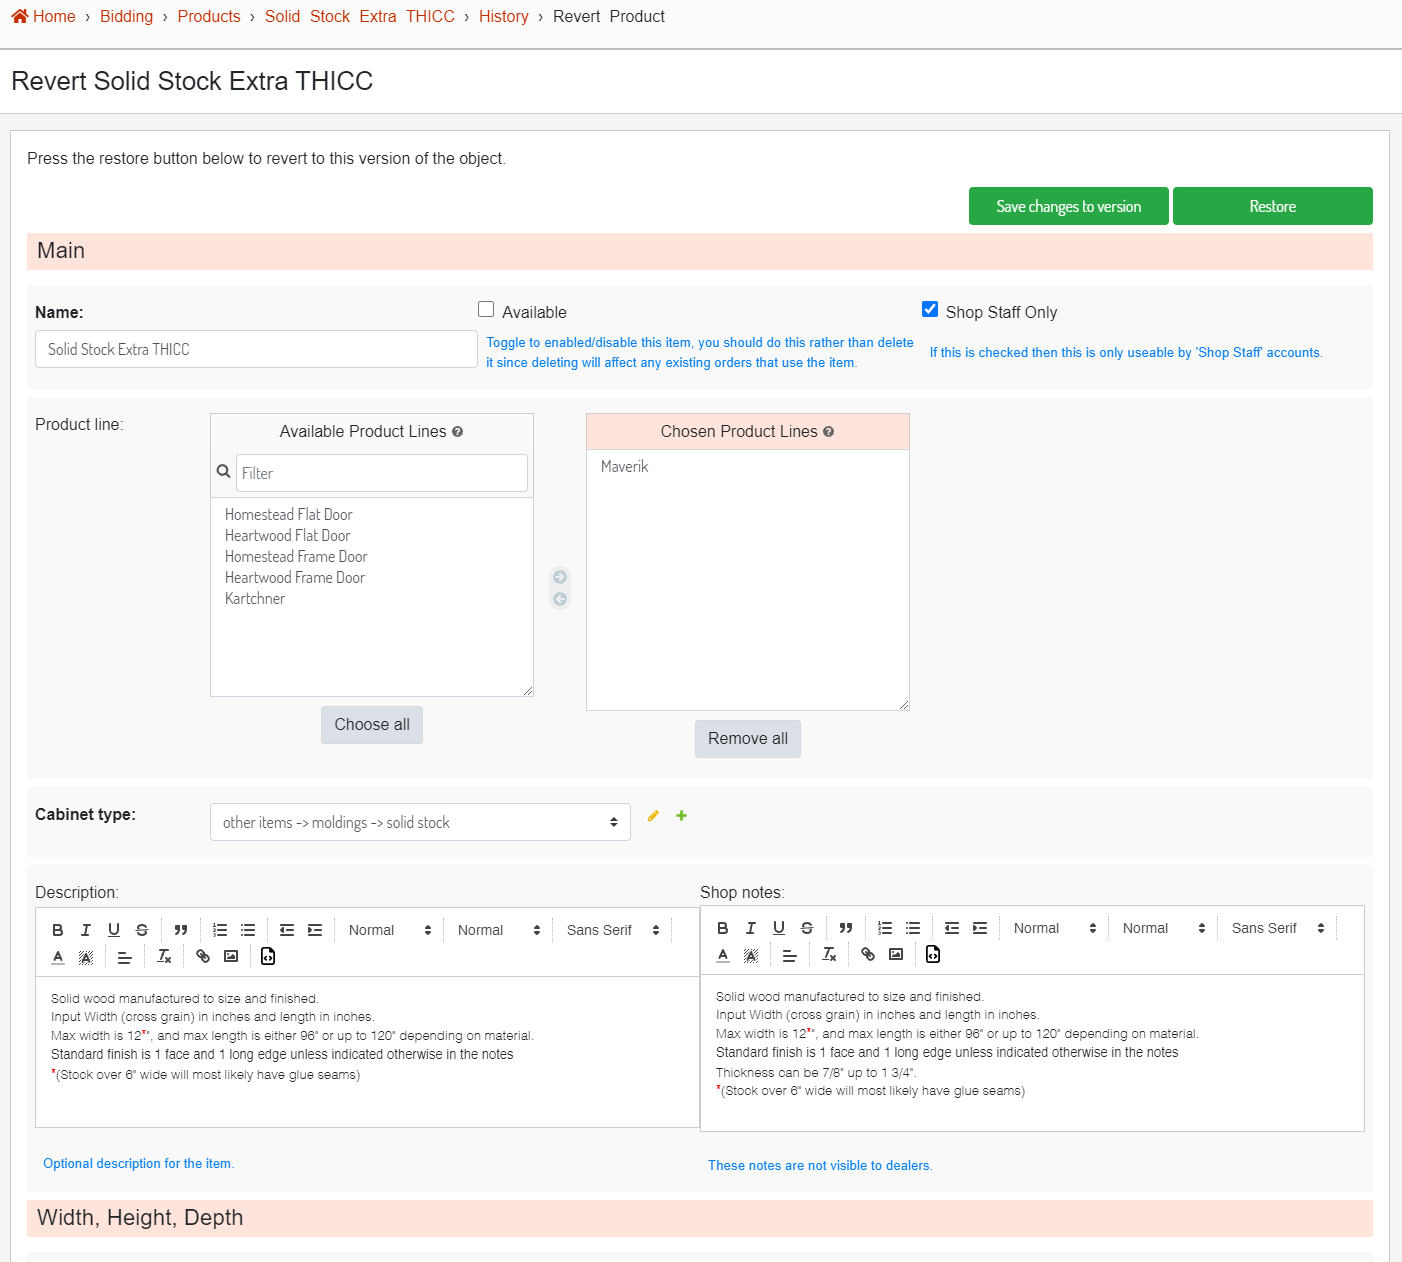
Image 3. Product version editor.
Save Changes to Version
The "Save changes to version" button will save the current version but will not impact the current database item. A possible reason you would want to update a version is if the pricing was saved at the wrong value and now needs to be updated.
Restore
Change Date
Using the Change Date dropdown date picker, you can assign a new date to any version. This is useful if you are trying to backdate / postdate a pricing change to a specific date.
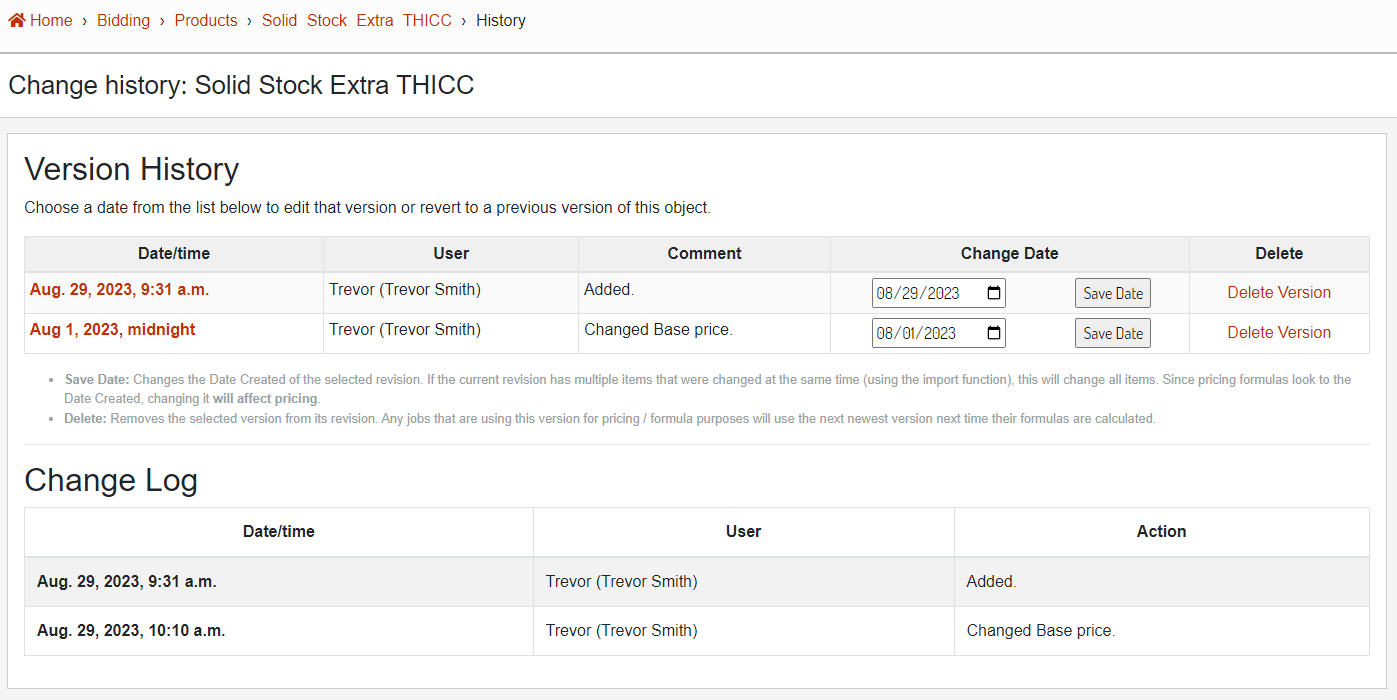
Image 4. Version with an updated Date / Time.
Delete
Using the "Delete Version" button will completely delete the version. This cannot be undone. This should only be done when you are sure that the version isn't needed.
Save as New
When adding a new product, it isn't always necessary to start over from scratch. If there is an existing item that is fairly similar to what you are wanting to add, you can use the "Save as new" feature to create a new product from an existing product.
1. Select the Base Product
First, select which product you want to base the new product off of.

Image 1. Solid Stock Thick will be used as the base product.
2. Make Desired Changes
Next, you will want to make any changes to the base product that you want reflected in the new product. For example, we will rename the Solid Stock Thick product and give it a new base price. After you have made changes, do not click the save button.
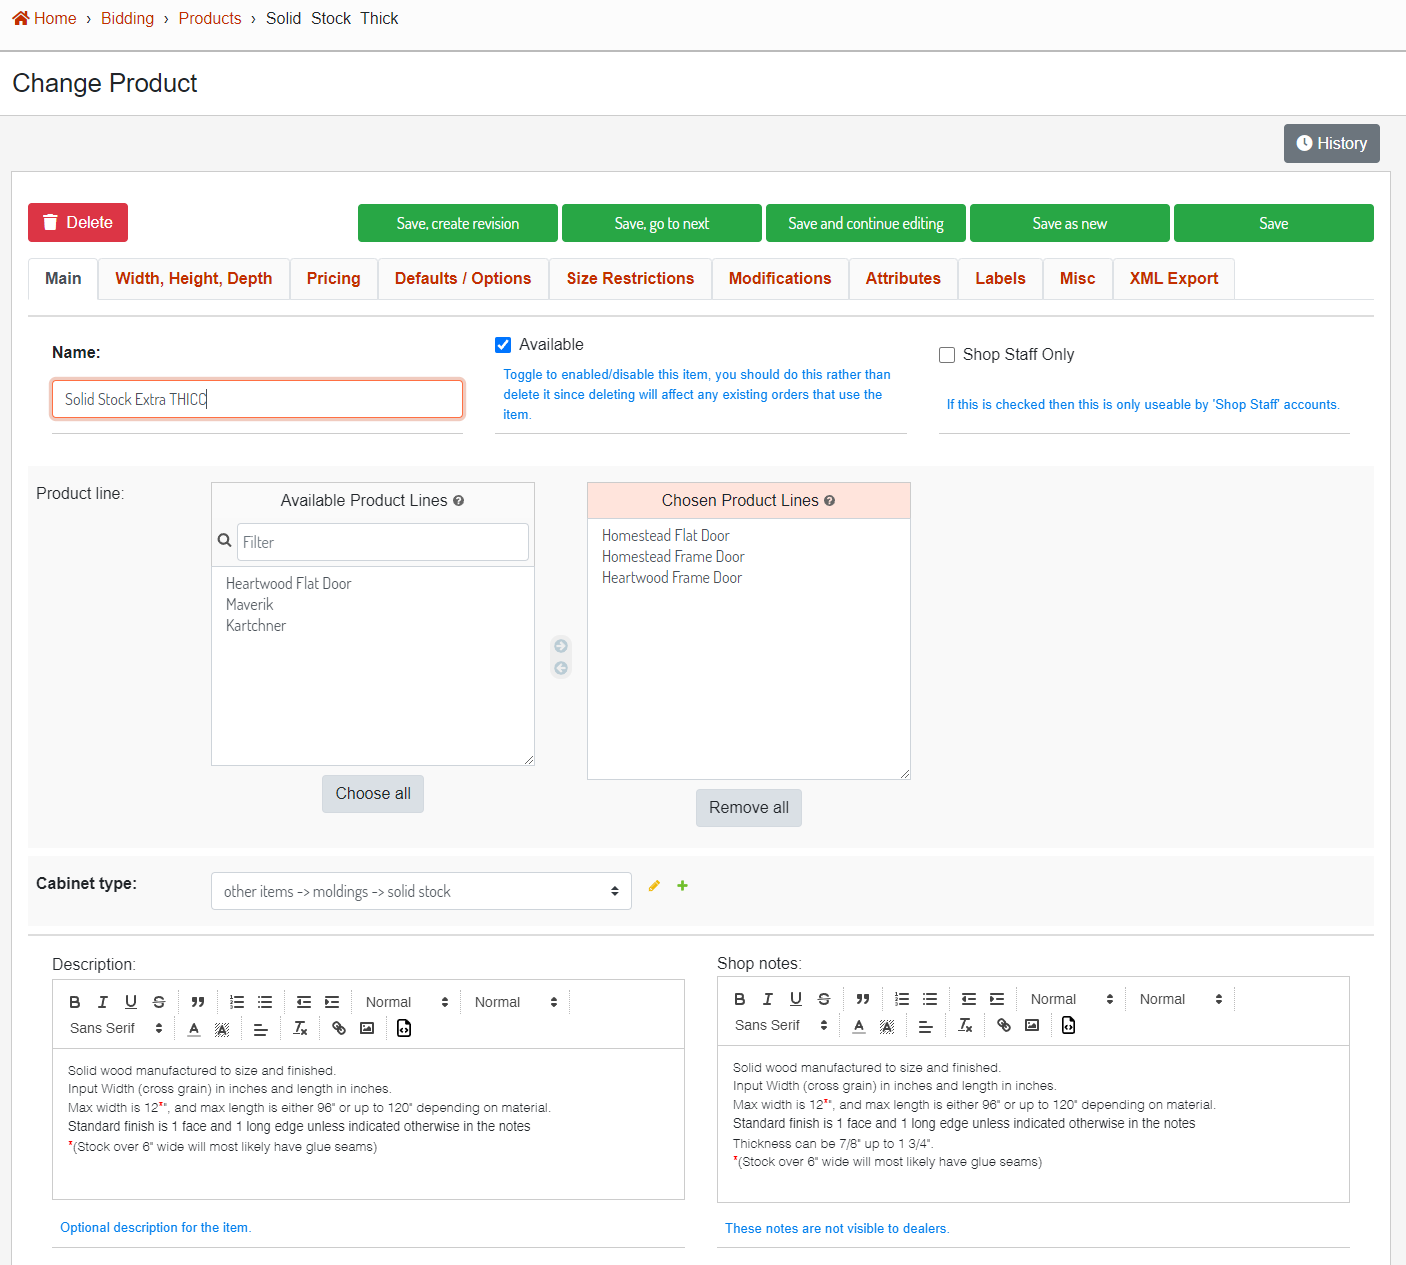
Image 2. Changes made to base product that we want reflected on the new product.
3. Save as New
Once the changes are made, use the "Save as new" button. This will create a new product with the changes you have made and will leave the original product unchanged. A new Version will be created for the newly added product, so it is important that if any pricing information was not changed before clicking "Save as new" it should be updated in the Version (see Pricing Version article) as well.
Heads Up: When you do a "Save As" some of the related objects such as Product Line, Modifications and other multi choice fields will not be populated. You will need to set these manually if they don't stick.
GUIDE: New Product with Attributes
This chapter will guide you through the steps of creating a new item with some customized attributes
Create New Product
To create new products you will need to go through the database administration site:

Then access the list of products by going to Bidding -> Products as explained on this page.
Go through each tab and fill in the necessary information:
Main
Name: The new product name
Cabinet Type: AKA Category, please select the category you want this product to belong to
Width, Height, Depth
This section contains the default width, height and depth of the product and allow you to set the following:
Allow Zero: If the is checked then we will allow values of 0 for width, height or depth. Normally this is not allowed.
Lock Width/Height/Depth: If any of these are checked then the field will be set to the default value and will not be changeable.